Monday, July 13, 2015

Display Your Small Quilts


I love making small quilts and if you're reading this and following my blog, you probably do too. Quilts come in all sizes and even though some call them "place mats" or "pot holders" our small quilts deserve the dignity of being considered real quilts too. Small quilts or doll quilts are where my heart is and are SO much fun to make since you can actually crank them out pretty quickly in between larger quilts if that's what you like to make most of the time.


There are times I like to experiment with quilt blocks, colors or styles I wouldn't necessarily feel like trying in a large quilt. In one of my books, there's a little Amish quilt and also a crazy quilt. I may not ever make a large quilt in either one of those styles, but the little ones sure are cute and you can make them in no time at all.


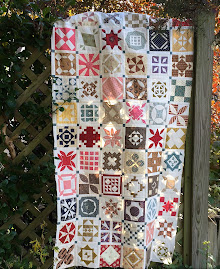
One of the best things about making small quilts is that they're fun to display around the house in different ways. Quilts really add something to a room whether they're dressing up a bed, draped over a sofa or hanging on a wall in an entryway. I am often asked -  what do you do with all your small quilts? Anything, really. Many of us hang these treasures of ours on a wall or place them upon a table. You can make a whole wall of quilts if you have more than a few. They can personalize a room and add color, texture and creativity to a space. The possibilities are endless.


Here's another idea for displaying the quilts -  on a doll bed. My friend Karen and her husband make and sell primitive doll beds (see photo of a black one, above) and now they've started making doll cradles too. Aren't these adorable?


They're perfect for showing off your small quilts and they come in assorted colors. There's a page on my website with a link to e-mail them for more info on purchasing one of your own. Don't just make the quilts and put them in a drawer, display them!


Monday, July 6, 2015

Let's Play with Some Nine-Patch Blocks


This month in my Small Quilt groups (Yahoo and Facebook - take your pick. See sidebar for info on joining) we're making small nine-patch blocks and putting them together into small quilts.


For the small blocks (3" finished), cut nine 1 1/2" squares. Larger block (4 1/2" finished)  is made from 2" squares. (For six-inch blocks, cut 2 1/2" squares if you like working with something a bit larger.)


It will be fun to see what everyone comes up with. I'll admit I love playing around with simple blocks more than challenging ones. Hence the nine patches this time. I get enough of the other kind working on my Dear Jane quilt. You can easily get one of these cuties finished in a month. 

I haven't actually made too many nine-patch quilts. Two?


Eliza Jane's nine-patch (see my website for pattern) 


Free pattern on my website

I do have a bunch of nine-patch blocks I made more than a few years ago for 2 quilts. One will be a simple throw and the other will be a small doll quilt. But - what a surprise - I haven't gotten around to sewing either one of them together yet. At first, I was waiting to find the perfect background fabric for setting the blocks. Should I go with light or dark? Indigo, red or tan? Stripes or a shirting? 

I decided upon dots for the small one based on this quilt I have always loved from am older book written by the Little Quilts ladies -  Celebrate with Little Quilts. 


Isn't it the sweetest thing? Mine will be very close. Lots of blues. This may be the month I finish this one.


For the larger throw quilt, I made 6" blocks and was inspired to do this same kind of background seen in the sample below. Some of you may remember that I spotted this quilt at a Country Threads booth at a quilt show a few years ago, fell in love with it's simplicity and was even able to find the same lovely fabric to use (Old Savannah by Paula Barnes).  I've only got 20 or so blocks done so far but I know for sure it's one I will finish eventually. 


My blocks are a tad more colorful  : )   Hope it works.

Finding ways to incorporate my favorite fabric, new and old,  into simple, unpretentious quilts, large or small, can be so much fun. I hope I've inspired you just a little.

So, if you're up for making a small nine-patch doll quilt this month (or any quilt. any month), join us in the Small Quilt Talk Yahoo group or the Small Quilt Lovers group on Facebook (info on blog sidebar) to see what we're doing. We'd love to meet you and inspire you with our creations.


Friday, June 26, 2015

It's Red, White and Blue Season


It's red, white and blue season for me. (I know for some of you that's all year long!) I've made more than a few small quilts in red, white and blue over the year and I enjoy displaying some of them around the house in the summer. Judging by how many there are I guess I must be partial to those colors. Until I took the time to dig them out I had no idea I'd made this many. There are probably more.


Gee, would you look at that - I do have a lot in this color scheme. Here are a few others -


This one is an oldie  : ) Can you guess where it's from?


So's this one. 

It's always fun to bring out the red, white and blues and make a nice display for the fourth of July. Do you do this too?  We're sharing some red white and blue quilts in my Small Quilt Lovers Facebook group if you'd like to join us. 

If you don't have any red, white and blue or red, tan and blue in your own collection of little quilts, maybe this weekend is the time to do something about that. Get out your scraps and play around with some simple blocks until something comes to you. It almost always does if you play hard enough.


Tuesday, June 23, 2015

Summer

I'm just checking in because my sister was worried I'd fallen off the planet since I haven't been blogging much. Well, I'm still here (and I told her to pick up the phone). After a busy spring I'm taking some time for myself. So I'm not doing much or at least nothing terribly productive: trying to solve a lot of computer problems, dealing with a lot of broken appliances and thus shopping for replacements (ick), a lot of having to deal with ornery contractors, a couple of doctor appointments, air bag replacements, things like that.

On the positive side though -  lately there's been a lot of walking (a lot of additional dog walking too when it's not raining), a lot of light reading along with a lot of reading looong good books with a glass of iced tea on the patio, a lot of family time, a little binge TV watching, a few barbeques, a lot of enjoying the back yard before it gets too hot to be outside, a little doggie play time, a couple of Dear Jane blocks here and there (6 finished this month so far).  Ah, summer. That's what it's for, right? Recharging. I'm acting like a kid on summer vacation from school.


Footloose and fancy-free days


I liked it fine. Did not think it measured up to the hype though. 


Yes, I loved The Goldfinch. Some hate it, I know. I liked it so much I'm reading her first book now, another long one. (The Secret History by Donna Tartt)


 I had a really sweet surprise too. My friend Sue Bennett made this little tumbler flag quilt - for me! How cute is it?


It's VERY cute. Let me tell you. You should see the stitching up close - perfect and tiny and slightly primitive.


Okay, that's what's up with me. All this fresh air (and blogging) is making me tired. I'm thinking of taking a nap. What's up with you? 


Wednesday, June 17, 2015

Make a Perfect Pressing Board


Are you dissatisfied with your ironing board or pressing surface? Long ago I became very tired of pressing my blocks on pressing mats that were soft and squishy. It's much better to press blocks on a firm surface rather than a padded one. I knew that my blocks always turned out nicer when I pressed on my smooth kitchen counters (which are made of heat-resistant soapstone) and I loved pressing there. Awhile ago I found a great tutorial on Cristy's blog for a firm, portable pressing board and have been eager to try making one of these for myself to fit nicely on one side of the cutting table in my (small) sewing area. 


I have to smile as I press and look at the sweet birdies.

If you're looking to change and enhance your pressing surface, check out her tutorial and make one of these cool boards for yourself in any size you like. It's very simple - all you  need is the board, fabric, cotton batting (NOT polyester), a staple gun and glue. I bought the inexpensive OSB (engineered wood board) at Home Depot and had them cut it 18" x 24". These would also be perfect in a smaller size for taking along to classes. I still have a large portion of the board left over from what they cut so I may make another and keep it somewhere else. 


The perfect pressing board  Thanks, Cristy, for the great tutorial.  Here's a link to a video made by Sharon Schamber (Cristy's mother). 


It's the perfect size for pressing my small blocks and my small quilts and much better than a large ironing board or pressing mat. The ironing board is tucked away nearby if I need it for borders or larger quilts : )


Thursday, June 11, 2015

Playing with Scraps


Right now there are scrap baskets all over my house. I'll admit, I haven't been very diligent in organizing them lately. Many of the small quilts I make are made with scraps from these scrap baskets. Some of the scraps I like to use and use again are pretty old--not vintage, just little pieces of some of my favorite fabrics I've saved over the years that are left over from other projects. If you're like me, when a fabric calls to you, you have to buy it even if you have no particular plans for it. I have a habit of hanging onto my favorite pieces (some of them are now pretty small) and lovingly spreading them throughout my scrap quilts. I never get tired of some of them. Those of you who have my books and are pretty sharp may have already noticed that I like to use some of the same scraps over and over in the quilts I make. 


It's not that I don't have enough other fabric (goodness) or because I can't afford to buy NEW fabric (I buy new fabric all the time), I've just formed attachments to some of them. Somehow it feels very satisfying to use those scraps and place the ones I particularly love in several different quilts (or, especially, in my Dear Jane quilt). Then, every time I look at one I have to smile because I feel a little tug. Seeing the special fabric might make me recall where I bought it or what else was going on in my life at that time.


I know we all love to collect our little scraps and save them to make doll quilts someday, but, in your collecting excitement - don't forget to use them!


We often dream about quilts we want to make someday. Sometimes, it becomes a regular pastime. I'm sure many of you have pictures of old quilts or quilts from your favorite designers just sitting around waiting to come alive as a real quilt.  One of the best ways I've found to get myself motivated to do this and actually make those quilts is to first take the time to organize your scraps. Otherwise, I get bogged down by the clutter and don't know what to do with all those little pieces. Try cutting them into same-size squares or strips to make it easier to use them up.


My sewing space is often a mess when I'm working on something, especially when it's several projects at the same time (No time to organize, too many things to do! More coffee!). Then it becomes a real chore when it's time to clean it up. But if I do it often and keep it up, it feels SO good to know where everything is, like a cleansing. Sometimes it's almost like getting new fabric because every single time I find a piece or two or three I forgot I had.

*  *  *

Well, it's time for me to organize some of my scraps (AGAIN) before I get too bogged down with a mess and then become stuck.  How about you? Feeling a little unmotivated? Not eager to start something new? Try to make a little time to organize your scraps. Then - here's an idea - after you do organize your scraps and pull out some of your favorites,  can you make a small quilt entirely from scraps in your collection? Nothing fancy, maybe just simple squares or four patches. Don't use a pattern, just let your creativity flow and just use up those little scraps, without cutting into fat quarters or larger cuts of fabrics.  Something happens when we do this . . . . It's fun and relaxing and if you're feeling a little stuck you'll be surprised at how it gets your creativity and motivation flowing again.