
Do you remember playing with pinwheels as a child? They always remind me of summer and picnics and the Fourth of July. Not many picnics happening this year I'm afraid . . . .

I've made a few pinwheel blocks and quilts in my day. There's just something I love about them.


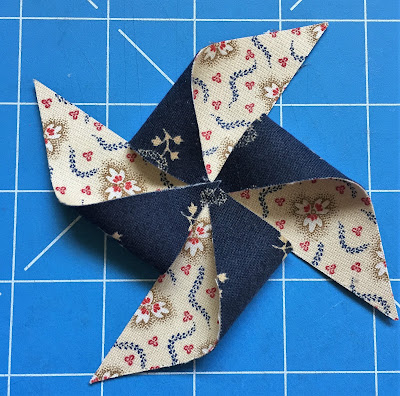
Today I'm going to show you how to create a Fabric Pinwheel. These are soo easy to make and may be just the crafty project for you to make this holiday weekend.
Here's what you'll need:
Fabric Scraps
Fusible web (Wonder-Under, Steam-a-Seam, Heat 'n Bond, etc.)
Fabric Scraps
Fusible web (Wonder-Under, Steam-a-Seam, Heat 'n Bond, etc.)
Glue stick, hot glue or needle and thread
Buttons


Buttons
1. Pick two pieces of coordinating fabric for each pinwheel. I cut each square 3 1/2" x 3 1/2" but you can make them smaller or larger. Each pair needs to be the same size. Cut a piece of fusible web the same size as the squares.


6. Sew a cute matching or contrasting button and that's it, you're done.


Some of you might remember that I made these a few years ago.

2. Press the fusible web to the wrong side of one fabric square. Allow it to cool and then peel off the paper backing. Line up your fused square with the remaining fabric square and iron the sticky fusible web side to the wrong side of that square. Press for about 10 seconds or follow directions for the fusible product you are using.
IMPORTANT: Try not to get the sticky part on your iron. I use an old pressing cloth or the piece of paper the fusible web was attached to and place it on top of the second square of fabric when I'm pressing.
3. Now you should have fabric fused on both sides. Trim the edges of your square just a bit. If your fabric starts to fray, you could try dabbing a little Fray Check along the edges.
4. Next, decide which print you want to use as the background (or inside) and place that side up. Cut each corner of the square on the diagonal - but stop halfway to the center.

5. Fold the 4 corners of the pinwheel blades toward the center and stitch or glue them down one at a time. Gluing is faster. Just sayin'.


6. Sew a cute matching or contrasting button and that's it, you're done.


This year, I tried making some in red, white and blue for the Fourth of July. Took me less than an hour. It will be fun to use these new ones on a wreath, don't you think?


If you intend to use these to decorate a vase or flower pot, buy a couple of thin wooden dowels at a craft store and then use some hot glue to stick them onto the back of each pinwheel. If you're feeling particularly lazy (like me) you can also use a hot glue gun to attach the buttons.
To make smaller pinwheels, just cut your squares a little smaller. Likewise, larger squares make larger pinwheels.
To me, the hardest part of this whole thing is finding just the right button for each center. It's fun to act like a child again and I had a good time playing around with fabric and digging in my old button jar. Working on a simple project like this can make all my stress disappear. Just looking at them makes me smile.
If you're in my Facebook group, don't forget to make a pincushion for the Patriotic Pincushion Parade tomorrow and post a picture.


6 comments:
Very cute! and I love the little pinwheel quilt at the top of the post.
Pinwheels are the best and you have made some gorgeous ones! Happy 4th!
Great post!! I love the little red, white and blue quilt. Also thank you for showing how to make the pinwheels. Happy 4th of July.
Hugs,
I hope to make a few pinwheels today. I made a few patriotic pincushions. Not on facebook. How can I post my pin cushions?
Jackie - you can join my other online group. We have photo albums for people to share there.
https://smallquilttalk.groups.io/g/main
They are brilliant, thank you for sharing.
Post a Comment