
Don't go looking for it here! I'm hoping some of you can help ME. Many of you out there are great at hand applique and I really want to get better. I'm not bad and I've already improved a great deal over time. I posted a query on Facebook this morning about why my DJ blocks look good when I first prep them for applique but after I stitch the pieces down they always turn out a little quirky. I'm often disappointed. What exactly goes wrong? Is it because these blocks are so darned small? I had an inking that this was worthy of a blog post because I know some of you struggle as well.

Looking good right now . . . but I never know what will happen. Check back tomorrow.
I'm much more patient that I used to be and using the no-melt Mylar templates and starch method has helped me tremendously (Thanks, Shirley!). But my applique is not consistent and I would like to improve.

There are actually times when my applique turns out pretty good -

(Janiacs - Yes, I know, I did not get these hearts as close together as they should have been and that makes me mad. Arrgh! But I am NOT doing this one over.)

Sometimes I get it absolutely right.

Other times, not so much. Why do the points flare and squirm around as I sew? I use basting glue and pins and the shapes still move. I have learned to live with the flawed ones but the perfectionist in me still wishes they were better and I would like to conquer this.
So, what are your secrets? Thread? Needles? Pins? Technique? Please tell me what works best for you and what has made a difference in YOUR applique. Especially when working with teeny tiny DJ pieces.
After struggling with regular needleturn, here's what I'm doing now - When I prep a piece for applique, I trace the shape and make a template from a heat-resistant plastic (DO not try this with plain old template plastic, it WILL melt.). I place my template on the wrong side of my fabric, trace, and cut out, leaving about a 1/4 inch all around. Then, I place the Mylar template back onto the wrong side of the cut-out shape, paint a line of liquid starch along one edge and press. Hold the iron down for a few seconds.
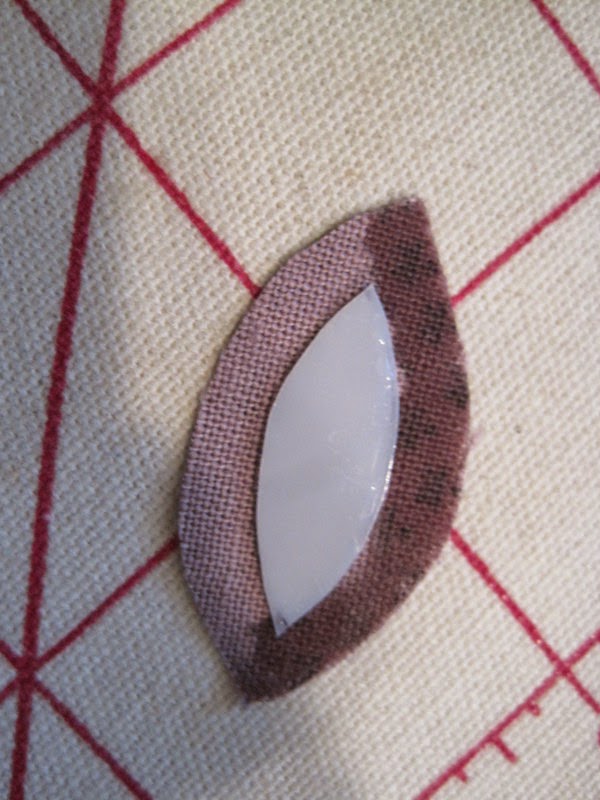

Turn and paint the other edge with starch and press again, flipping the points. When it dries and cools, lift the template out and stitch the applique onto your background fabric.


There are many good tutorials for this method on You Tube or elsewhere on the internet. I even bought the Karen Kay Buckley DVD that takes you through it step by step.
They still come out a little quirky and the points are smushed. Keep in mind these are very small peels.
There are many good tutorials for this method on You Tube or elsewhere on the internet. I even bought the Karen Kay Buckley DVD that takes you through it step by step.
I am going to work on this as I stitch a DJ block today. Maybe two if I'm lucky enough to be uninterrupted for awhile. Then, on Saturday, we're getting the Christmas tree, the boxes will rise out of the basement, the decorating will begin and everything else will be on hold until the holidays are over and I have more time to myself. Have a good weekend! And thanks in advance for your tips.


33 comments:
i think your applique looks great. i think you might be to hard on yourself. you might want to try having less seam allowance especially on circles. i have some tutorials on my blog too.
Your applique looks wonderful to me! Personally, I love a bit of a rough look for my applique, but here are some things I've picked up through the years for Needleturn just from trial and error plus reading tips. A good (sharp) skinny needle is essential especially for those pointy tips--I love Scarlet Today needles but the straw needle don't work with my thick fingers. DMC machine embroidery thread is super thin, silky and glides easily through the fabric--good thread really does make a difference even though I didn't want to believe it for the longest time! And the other thing that I don't always pay attention to but does and will help is if your applique pc. has a curve in it (like a leaf), it really does help to cut it out on the bias there on the curved side and then cut 3/16 instead of a true 1/4". Anyway--I'm sure you know all this stuff, but it all helps me when I want a better applique! Best of luck with your DJ. I'm still a coward about starting one of those projects.:)
I was so hoping you had the answer! Your applique looks great to me. My Grandmother would tell me practice and repetition make perfect
My life changed when i learned the back basting method of applique. Have you ever tried it?
Back basting has changed my life as well. I am able to very very thin vines, intricate floral pieces and the like now. There is a book on back basting on Amazon I bought recently. Can't remember the name, sorry.
Ten paciencia, a nosotras nos pasa igual que a ti. Pero poco a poco iran saliendo mejor.
Un beso.
My secret is a wet sharp ended toothpaste. No starch, no back basting. Just plain needle turn appliqué. Works like a charm. Try it!
Happy Holidays! Mary
Kathleen, I tried the method you are using and was hopeless at it. I somehow managed to either melt the Mylar into the templates or would use to much starch and soak my fabric. Now I use iron on freezer paper on top of my templates and find it much easier to get nice sharp points. I use silk thread and Milliners needles. However looking at your blocks, I think like many quilters you are too hard on yourself. I love applique and work on some little project every day even if it's just for a few minutes. I just purchased the DJ book but have not been brave enough to start a block yet. Right now I am looking forward to working on the wool projects for a change.
Looking lovely, but I understand your frustrations! I was a loyal back basting gal as well, that was until I was introduced to Helen Stubbings (Hugs & Kisses designer) applique paper it is fusible and soluble! No removing papers! You need a glue stick and the applique tools Lynette Anderson sells are fabulous. She also has Youtube tutorials, if that will help. I did put a tutorial on my blog as well.
As for the leaf tips, maybe trimming small tip of these with reduce bulk, also I have found that you need to anchor the point down with a couple of stitches before moving to the next side. There are soooo many techniques for applique, some work better for some folks better than others. Good luck!
I do needle turn applique. The amount you're turning under may be too large. I use a # 10 straw needle, #50 cotton thread. Use a sharp pointed toothpick to help you turn under sharp point. Not sure what else I can help you with expect your turn under fabric looks too large.
This has possible already posted, If it has, I apologize.
I agree with Sylvia that your seam allowance is a little large. I rarely have more than a 1/8" and sometimes less. My fabric behaves and doesn't fray because I starch my fabric very heavily before I start. I prefer good old cheap Faultless Heavy Duty spray starch. It's what I use to turn over the seam allowance too. I spray it in a little dish and use a paintbrush. I've used Mylar and it's great but it's really expensive. And I have great luck with with a double layer of good freezer paper. Save the Reynolds FP for wool applique patterns.
That all said, I do agree with everyone who recommends Back Basting. I'm hopeless at it, Everyone else I know has great luck with it.
Practice is what makes you a good appliquer. Just keep doing it and you'll be fine.
I'm trying to determine the FASTEST way to do needleturn. Which is what all of these techniques are.
I love applique. It's so much more forgiving than piecing. I had to piece a small block and it drove me batty. I remade it 3 times before I was fairly satisfied.
I love the way you started this post! ;-)
I think the secret to better points is to cut away the excess fabric. That was you have less bulk to turn under. Jane Patek has some videos on appliqueing points... she has them on youtube.... they have helped me immensely! Enjoy!
Sorry.... typo... it's Jan Patek
I think your appliqué looks terrific but maybe your seam allowance could be a little smaller. I use freezer paper templates instead of mylar. It’s less expensive and easier to cut a smooth edge. I also tried back basting but kept losing my turning line made by the thread and ended up with a mess.
My favorite applique technique is "needle turn". Check out Wendy Gratz at https://www.youtube.com/watch?v=BCvk2elwxuA
Her four minute instructional explains it perfectly- no fancy templates, no starch, just beautiful results. This technique is (though more time consuming) will give sharp points and can be done around curves with ease.
I am also working on the DJ and one block Goes better than the other. I am still learning but some turn out better than others. I also think of what Jane herself said : better finished than perfect!
Another thing that I find really helps is to hand baste my larger pieces onto the background rather than using pins. The pins distort the pieces.
Christine
I have appliqued and loved it for many years but a few years ago I tried back basting. Now that is my favorite method and I use it whenever I can, it makes everthing so precise. If I have a piece sometimes I use BB for the bottom piece and template method for the other layers. You should give it a try and see if you like it, I think you will..Happy Stitchin'
Kathleen, I got a giggle our of your blog title and opening sentence! You got me, had-har!! Thank you for blogging about your DJ frustrations. I have had everything for 5 years now to start my DJ but truth be told, I thought I would be up to par with appliqué techniques by this time and I'm the complete opposite. Your blog has now sparked my DJ interest once again and I want to follow along and learn like you. Thank you so much for this forum of DJ education!! I do wish you all the best with your DJ journey.
Thank you for addressing this problem. I love hand sewing but have all the same frustrations. Will be trying anything anyone suggests. Thanks again!
Jane Arthur
Gloria - see link to my Yahoo Dear Jane group on rightn sidebar.
Your applique are fabulous and these little ones spectacular,love them all.Go you can!!
There are several nice tutorials on Fabric Therapy for freezer paper on the right side with glue basting. I like to iron mine after that before stitching to make sure everything stays just so. Its the best method so far of those that I have tried.
WOW! Thank you for your honesty. The comments are fantastic. Applique is one of my favorite things to do, and I, too, have struggled with points, and, also, I have the KKBuckley DVD. That's my preferred method. I would encourage you to review her method for points -- she turns under the tail with iron and starch. (I agree that your seam allowances seem a tad large.) That's been tricky for me, but, with practice, I'm getting much better. I have watched the DVD numerous times, and will continue to review it when necessary. Tools make a difference, too. I like Aurifil or Prescencia (sp?) thread, Jean Lyles 10A needles (I bend the straw needles), KKBuckley "perfect" scissors, a good stiletto, and Magic Sizing (WalMart has the lowest price).
Kathleen, just relax a little. If for you get too frustrated, put it down, walk away, pet the dog, have a bit of chocolate, and RELAX. Stitching should be fun, not frustrating. Experiment with different tools and methods to find the ones that are most comfortable for you. Most of all remember: PERFECTION IS OVERRATED!
Kathy One of the things that I found works for me is that I use Pellon 805 on my applique. It is very thin so no heaviness in the piece even wtiht 2 or 3 layers. I do my applique by hand but I do know that it doesn't cause problems when used on machine. I put the 1st layer on the back. Then I iron my fabric edges to the pellon. then I add a new piece of the pellon on top of the new back of the applique. Then iron to background. I found that this hold those edges in between the pellon layers as I fuse it down to the background with out any sort of displacement giving me a clean stitch as I hand stitch my way around it. I like the Pellon 805 for it's lightnessand the fact that once the paper it removed it almost acts like it is double sided.
Hope this helps you.
Tricia
Oh I forgot..... I found that if I use a blanket stitch in my hand applique, it's less stressing and frustrating for me which allows my to enjoy the process as I know that trying to do needle turning or some other way can send me into tears. I stick my tongue out at the Quilting Police and have learned to adapt to my skills.
Sincerely,
Tricia
I agree with the ladies: the seam allowance seems a bit too large...
And I would tell you to baste the piece before sewing.
This is the best way to avoid the shifting.
(at least for me works better than pins!!)
I think applique is one of those techniques where you have to do 2 things - first, find the technique you are most comfortable with; second, practice, practice, practice. I do agree with the women who said you may be turning a bit too much fabric for those tiny pieces. Don't beat yourself up, just enjoy the process.
First of all, you are too hard on yourself. Your blocks are lovely! I just finished the one you are working on and if you go to my Blog you can see I did the applique onto the background. I have been quilting for so long I am I sometimes feel like I am in the "Can't teach an old dog new tricks" category, however I have learned that for blocks this small with symmetrical shapes, back basting really does work well. I needle turn everything and never use glue or pins or starch. Applique is my favorite part of any quilting that I do and my only advise for anyone is practice, practice, practice and Enjoy! Thanks for sharing your lovely blocks.
Get quality and legit facebook fans for your page to increase sales and create a brand name. Buy Facebook Likes
Hi Kathleen! I do lots of needle turn and wool applique and found Piece O Cake method works best for me, using clear plastic overlay. I also use a wonder under feather light double sided paper fusible stuff on the backside of my pieces for applique. I like the crisp edge the backing gives me and trace the image on plastic with an ultra fine sharpie marker, mark R on the upper rt corner to ensure all pieces will be where they should! Ask me! LOL
Another secret is YLI silk thread, you will never see you small stitches, and I have had the best look for mine!
Finally, I tack my prices for applique down with thread vs pins. My project travels better without the pins poking me or others! And the pieces never move or fall off!
Finally, Enjoy the process!
All the best and thank you for all you do!
I will miss your monthly challenges on the Yahoo group! Take care, Leslie
Hi Again! I use a 100 wt silk thread and size 11 Clover gold eye needles. With the fusible backing paper, I cut out around the paper about 1/4 inch away and clip around closely to make it easier to turn under the fabric to the back. Sometimes I play it by ear, depending on the size of the applique pieces and find too narrow an allowance and the edges fray. Good luck, Leslie
Kathy - You are much more adventurous than I am. I have tried applique several times and have never been really pleased with the results. I am too much of a perfectionist as far a placement and turn under go. There is a blog I watch a lot that does FABULOUS applique. It is Fabric Therapy and she has several tutorials on her blog as to how she does applique. Here is a link to the first one: http://fabrictherapy.blogspot.com/2011/04/glue-stick-applique-tutorial-part-one.html
Good Luck!!!
Kara Krantz
Post a Comment