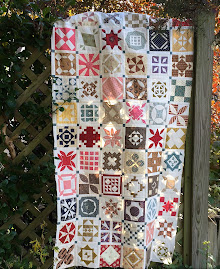
It rained quite a bit last week and so I cocooned, stayed inside and worked on some DJ blocks. I know I might not have a chance to do much in the coming months because summer is always a busy time for me. On Friday, I started to choose another block to sew using a red print and it occurred to me that I wasn't really sure how many blocks I'd made from red or brown fabrics - probably way too many - and where they were positioned. I "sort of" try to follow Jane's scheme, but not always. I enjoy using a wide variety of colors in my quilt. I'm afraid there will be clumps of red or brown blocks together though. I'd like the colors to be more spread out and hope the overall picture will not look too dull. (I won't even consider placing them in a different order. I'm a "Stickler" for them being in Jane's order, LOL. Get it?)
On Saturday, I took it into my head to create a block chart to see my progress and try to "catch" the colors for the blocks for when I sew them together. I do not have the space to keep them up on a design wall for years as I attempt to complete the quilt.
There's a block chart included with the DJ software by EQ and it worked for me for awhile. You scan the blocks and insert them digitally into the chart provided. Then, one day it stopped working. I just could not get it to work again, no matter how many times I tried. No suggestions worked for me. I tried EQ support and they could not help so I essentially gave up and just crossed off the blocks onto the print out as I finished. It was a lot of fun to make my own block chart, however, so I don't miss the old one.
On Saturday, I took it into my head to create a block chart to see my progress and try to "catch" the colors for the blocks for when I sew them together. I do not have the space to keep them up on a design wall for years as I attempt to complete the quilt.
My old block chart - too small and not very helpful.
I'm so happy to be able to view my quilt partially put together and also to see what progress I've made. At times I become discouraged because I don't seem to be making as much progress as I'd like. There are sooo many blocks left to go. (I've just completed 70, no small feat, but still . . . .) Surprisingly, seeing the blocks laid out on the grid motivated me quite a bit and made me feel good about the progress I have made. I am wondering if this might work for some of you and wanted to share. I know that in this day and age this is really an Old School way of doing things but, hey, it worked for me. Reminded me of school projects I worked on in the third grade, playing with poster board, cutting and pasting . . . . My husband kept laughing at how earnest I was, lining up my tiny blocks and pasting them into place.
Here's what I did. If it helps even one Jane-crazed soul, then it was worth doing and writing about it. First, I bought a poster board, cut it into a 22" x 22" piece, drew a grid of 1 1/2" squares to represent each block of The Quilt and labelled the rows. Then, I took photos of all the blocks I've finished. I put them into a file and adjusted the size of each photo to be 1 1/2 inches square. Next, I printed out the photo sheets and cut and pasted the photo squares onto the poster board. Voila! My very own DJ block chart where I can now just insert the blocks as I finish them one at a time. (If I did this digitally, by creating my own grid on the computer, I would have to print out the entire chart every time I finished a block.)
A much, much better way to view my blocks. Large enough to see the blocks but not too large to display or store.
It motivated me to keep working on the Trip Around the World motif in the quilt - diagonal rows that radiate outward and surround the center block. I can see it now! Mine is not as accurate as Jane's but similar as far as placing the pink and yellow rows. In between, there will be a brown/tan row and a blue row. Wish I had been more careful with the reds so I'm not sure if I will do a red row. And I haven't been able to find a perfect lovely bluish-green fabric for the center block yet. But I'm looking.
Pinks for the center Trip Around the World placement.
Newly finished blocks I know I would not have attempted before starting this quilt.
This journey has been so much fun and I have become a much better quilter for it, learning patience and skills as I go along. You cannot imagine how happy I am that I started this quilt and don't know exactly how or why it has pulled me in so deeply (along with thousands of other quilters). I love the idea that if and when I finish it it will be a part of my legacy to my family and perhaps the quilting world someday. As well as a wonderful homage to the past.


12 comments:
Felicidades por ese maravilloso trabajo. Las que estamos haciendo el DJ nos sentimos orgullosas de nuestros avances, aunque no sean tan rapidos como quisieramos.
Un beso.
Goodness, and I thought I was meticulous.
My own process is to use the blank chart at the front of the book (or one could drawn their own chart if they want it bigger) and each time I finish a block, I cut a piece of the fabric and glue it in position. Sometime 2 fabrics, of course. It helps keep the colour balance, and keeps them from clumping.
I'm not really following Jane's colours, though I do sometimes, especially if I have fabric that looks just like Jane's.
That is going to be an amazing work when you are finished! I loved Remembering Adelia, and in fact, a group of ladies from my quilt guild did a little quilt of the month club. I made the orange peel on the front of the book with Kansas troubles charm squares---now, I want to make one using Civil War fabrics! Hi, I love your tutorial and your block! I am RenaissanceSandi...and I am one of your fellow bloggers for the American Made Brand Solids Blog Tour. Please stop by and follow my blog, if you like. RenaissanceSandi.blogspot.com
Kathy, what a great idea, and how cute are those miniature photos of your finished blocks!
Btw i'm also a stickler for doing it Jane's way :))cheers... Marian
I am a red-and-white Stickler I have just finished my 1st block so wish me good luck.
Your DJ blocks are they paper pieced or the old fashioned way? Beautiful work...just hang in there!
Kathy, that is a wonderful idea and very helpful!
Have a nice day!
Renate
You are amazing!! You should have been a teacher! When you get done with your quilt your chart/board will be a work of art in itself. You will have to frame it!
thank you so much for this post. I have been trying to start my DJ. This weekend I spent two hours trying to paper piece the little A block you have pictured with the X in the middle. I just could not figure out how to accomplish getting that middle square done. I ended up getting frustrated after about 6 attempts and throwing it all in the trash. Packed my DJ fabrics and book right back in the drawer they came out of for another day. I have a hard time paper piecing it because even though I tried the three strip method the pieces are not numbered for order of stitching.
I was speaking of the small brown and white block in the bottom right corner of your picture.
Mary- mburnette912@bellsouth.net
personally?
i think you are the cutest quilter in the Universe for doing this! its absolutely delightful : & i doubt your husband will be laughing when you complete the project in such dazzling organisational style... ;)
i had the chance to see my only real Dear Jane quilt this weekend, at the Victoria Quilter's Guild show... & truly, as the door raffle prize? it was :: a s t o n i s h i n g ::
your enjoyment & passion are contagious! <3
I have recently started the DJ quilt and do love it too! I made a chart to paste the fabrics I'm using on, but I like your idea of printing the pictures and pasting them on a larger chart. I didn't want to buy the DJ disc and I'm following the instructions on "that quilt". I think I have 12 or 13 blocks done and now I'm moving, so hardly no time to sew, but hope to get going on it again soon. It is such an amazing quilt and there are about 20 women in my guild who have started it. Thanks for your idea!
Thanks for one's marvelous posting! I certainly enjoyed
reading it, you are a great author.I will make sure to
bookmark your blog and will come back later in life.
I want to encourage that you continue your great work,
have a nice evening!
Post a Comment