Wednesday, March 1, 2017

March Winds and Pinwheels

March is always such a windy month here in Chicago.


That's why I chose my Scrappy Pinwheels quilt for this month's small quilt challenge -  it reminds me of gusty, windy days. Twirling, swirling pinwheel blocks made with all sorts of wonderful scraps.


I look at this quilt and I think of those twirly propeller hats. Ready for lift off!


You know I love Civil War era and 1800s reproduction prints and so yes, that's what I used to make mine.  From some of my favorite scraps. But you can pick your own colors to make your quilt. That's the rule. Make what you love.


Have fun playing around with your scraps. Join my Facebook small quilt group and show us a picture when you're finished.


Also, I'll be posting another Mystery Quilt clue on Friday, March 3. You'll find the directions for my free Welcome Home Mystery Quilt sew along  in the Files section of the Facebook group (access the files from the group home page) or in Files in the Yahoo Small Quilt group. We're making this quilt a little bit at a time and we'll finish them in August or September. 


Monday, February 13, 2017

Little Hearts

There was no time to make a quilt but I still had to make a little something for Valentine's Day.


I sort of followed a tutorial on the Cluck Cluck Sew blog for making the hearts but fooled around and made mine a little bit smaller for a coaster and mug rug. Or, maybe I'll surprise myself and make a few more and then that one on the plate will become a block in a quilt someday.


Right now I'm working on the second block(s) for the Welcome home Mystery Quilt.  I'll upload the pattern to the files in my Yahoo and Facebook groups on Wednesday, Feb 15. Don't worry -  this part will not be nearly as difficult as the first block. Oh my goodness, what a disaster with those templates and the sizing of the block. Sorry for all of the confusion when some of you printed out the pattern as a .pdf file. The rest of the quilt will be more straightforward and the remaining blocks much simpler. 

Happy Valentine's Day!


Wednesday, February 8, 2017

Civil War Baskets

Continuing on with workshop photos . . . The Bloomington/Normal Illinois quilters made these baskets from my book Remembering Adelia last weekend -


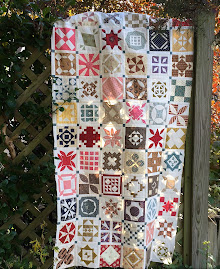
Here's my scrappy Civil War Baskets quilt. 


Here are some of the baskets the workshop group made - 


Lots and lots of pretty prints. 


Civil War meets Batiks . . . .


Making those basket handles wasn't as difficult as they expected. 
Once you get the hang of it, it's easy. 

If you're hesitant about making handles for your baskets - here's a simple method that takes away a lot of the stress. You can use the same technique for making vines and stems on other applique projects. See the full directions in the back of my book Remembering Adelia.


The first step is to cut your fabric strip on the bias - which means that it's cut on the diagonal of the grain.


I used pressing bars to form the handles. These are 12" long, heat-resistant plastic bars for making applique vines and stems. They come in a package with several bars of varying widths. You may prefer to use bias tape makers and they work as well. Just follow the package directions for the tool you use.


For the bars, fold the strip WRONG sides together and sew a 1/4" seam along the raw edge to make a tube. Cut the ends of the strip to the the correct length - for the Civil War Baskets it's 1 1/4" x 6". After sewing, trim the seam allowance a little.


Slide the rounded end of the pressing bar into the fabric and press as you roll the seam to the middle. Press the seam in one direction. When you turn it over, the seam will be hidden. Remove the bar CAREFULY as it gets very hot and finish pressing the tube flat.


Now you're ready to shape the handle into the curved shape and pin it to the background fabric. Since the fabric was cut on the bias it will stretch easily. Find the center and pin. (Mine is a little off but it's just a sample piece.) Baste, pin or glue the handle in place. Then, applique it down either by hand or machine. Voila! Easy bias-strip basket handles. Follow the rest of the directions in the book or your particular pattern to attach the handles to the basket. 


 You can also make handles with the 1/4 inch Clover bias tape maker, which is what I used for these handles in my Cherry Baskets quilt from last year's doll quilt club. 


Sunday, February 5, 2017

Scrappy Stars

I always meet the nicest quilters. I taught a couple of workshops for the Hands All Around Quilt Guild in Bloomington/Normal, Illinois, this past weekend. The first project was the Scrappy Stars quilt from my book Remembering Adelia. Everyone seemed to have a great time.


This is a great quilt made with blocks that resemble a LeMoyne Star. No set-in seams. Thought you would like to see some of the students' work.  I love seeing what others make from my ideas. They're all different. Isn't that one of the best things about quilting?  Being inspired by something someone else has made but creating something that's uniquely your own . . . .


Thanks for a great time, Bloomington/Normal quilters! 

I'll show you some gorgeous scrappy basket blocks and quilts from the second workshop in a day or two.