Monday, November 5, 2018

Dear Jane Progress

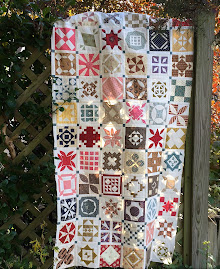
Marian and Jeanne brought their finished DJ tops to my retreat here in the Chicago area last month. What an inspiration that was!


Seeing these lovely quilts really motivated me to get back on track and finish putting all of my own blocks together. So, now my Dear Jane quilt is half sashed. I'd say half finished, but I still have to make the triangles. Sashing first - or maybe I'll take a break from that and make some triangles. Who knows? I do have to tell you that I am so proud of myself for not giving up! It's been "only" eight years since I started my Jane journey . . . . 

So, if you think you're finished with that DJ when you're actually not, or you thought of starting one but never did, there's still hope. Drag it out or buy the book and make a plan. Believe me, it will be worth every frustrating stitch. Make sure you take advantage of every website and tip available. The Dear Jane website has lots of tips and lessons to help you so check it out. When I first started making mine, I printed out the lessons and tips and placed them in a notebook. Lots of help there if you find you're struggling. The Dear Jane software by EQ was also invaluable to me. There are lots of lessons and tips included with that too. It's a stand alone software so you don't need Electric Quilt for it to work. That Quilt is another good resource for making the blocks. Then, just take it block by block, one at a time, and they'll add up. 


The very first Dear Jane quilt I saw up close, made by Karan Flanscha of Iowa, had 1/2" blue cornerstones. I was impressed with the way they looked in the quilt and so decided to use the cornerstones in mine too. 


Some of my early blocks look rather wonky. I was never happy with the way my first version of this F-13 block turned out. It's different from Jane's original block. See? When I made it years ago, I followed the design in the book, not the pic of Jane's block (duh) and it's slightly different. It's always bothered me that the circles don't touch. Silly of me perhaps, but I took the time to redo it last week and now I like it much better and in brown. I knew it would always bother me if I didn't change it. And it really didn't take long. I use the starch and no-melt templates method of applique to make the shapes, then stitch on by hand. That's pretty fast and easy with a little practice. Makes applique fun too.

So here's my almost half-finished quilt. I'm sewing it into unequal quadrants and then sewing the quadrants together. Two down . . .


*  *  *

Fall has arrived here in the Chicago area but it's leaving fast . . . . Glad I was able to get out to a local forest preserve one day last week to take some pics before all the leaves fell. I think I missed the really vibrant colors by a couple of days.


Have a good week - Don't forget to vote tomorrow! 


Saturday, September 8, 2018

Scrappy Stars Sew Along

I decided I really needed to make a simple, scrappy lap quilt so I started  making some 6" stars for it. I challenged myself to make the blocks by the end of  this year, a few at a time. Then sew them together into a quilt in January or February. I'd like to get it done before the winter is over so I can actually use it.


I know from experience that if I really want to accomplish something, I'm better off starting small, then build up momentum as I go along. Start like gangbusters and I'll be stressed out and unproductive in no time. If I set small goals for myself, like, say, just make a few blocks a week, I might actually get something finished. These blocks will add up. They're so much fun to make. I've already gotten 12 done in less than 2 weeks. No stress, just having some fun. I'm also trying to finish my larger 3" nine-patch lap quilt at the same time and so alternate projects.


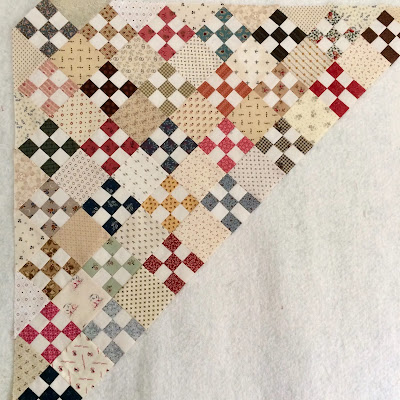
For this one I need 30 diagonal rows. I've already gotten 15 rows sewn together but still have to add the rest to this finished part. Little at a time. . . . 

Anyway, I've challenged some in my Facebook group to sew along with me on the stars. I'm aiming for 50 - 60 blocks but you are all welcome to join me and make as many as you like. Make 6 star blocks and put them together into a small quilt. Or, make more for a larger quilt. Just see how it goes. It's fun to see what everyone has made and the fabrics they've used. 


I'm trying to make at least 5 blocks per week, give or take. I know there will be some weeks I'll get nothing done. But, by the end of the year, I should have a very nice pile of stars. Then I'll decide on the setting. I'll probably alternate the stars with plain squares. Indigo, maybe. We'll see.

Join our sew along and get the printable star pattern in .pdf format here


Or, here are some simple cutting directions to make one 6" block - 

Cut one  3 1/2"  x  3 1/2" square for the center
Cut eight 2"  x  2 "  squares for the star points
Cut four rectangles - 2"  x  3 1/2" - for background
Cut four 2"  x 2" squares for the background corners

This will give you a finished 6" x 6" block. 


I like to choose my fabrics one day, cut the pieces, lay them out on a cutting mat, set the mat aside and then sew another day. So far so good. 


Before you know it, they'll accumulate.

The small quilt challenge for September is American Crossroads from my new book, A Prairie Journey. You can order a signed copy here.


Saturday, August 25, 2018

Vintage Sewing Machine Base

Remember that vintage sewing machine I showed you a couple of weeks ago that needed a base? Well, I finally found one and I'm extremely happy with it. My machine fits inside the box perfectly. Workmanship is excellent. Cherry wood. It's exactly what I was looking for. It even has a little compartment for storage.  I bought it on Etsy from this guy.  Don't you love it??


Love the engraved Singer logo.


 I bought a 1/4" foot for my OTHER vintage machine recently and I expect it will fit this one as well. So I'm all set now.


Of the two, I love this little baby best.


Okay, so now I have two vintage machines. That's it. I have a tiny sewing space and hardly any room at all so I am NOT starting a collection, I am NOT starting a collection . . . .

Enjoy the weekend.


Sunday, August 19, 2018

2019 That Patchwork Place Calendar

Do you have your 2019 That Patchwork Place calendar yet?  My Scrappy Pinwheels quilt is in it -


Patterns for the quilts are included. 


This is always a great calendar. But, be warned - they do run out fast. Trust me, come January, you will have a hard time finding it anywhere since it's not like a book, only so many are printed up. So it's a good idea to get one now while they're hot and in stock. Check your local shop or see Martingale's website to buy one. 

I'm working on a version of the nine-patch quilt on the cover. After I spotted this quilt in the book Preserving History, which was published a couple of years ago, I couldn't get it out of my mind.  But the nine-patch blocks in that book were very, very tiny, which made me a little uneasy.  So, I started making some little 3"  x 3" blocks last year, which were much more manageable. For me, at least.


Just lots of simple nine patches made from scraps. I challenged myself to make a few every day or at least 10 a week, in between everything else. No pressure. I loved the quilt so much I knew that once I started I would eventually finish. I set the blocks aside for awhile and then decided to pick them up again in the spring. Started making 10 a day, which wasn't too bad because they went pretty fast. Pretty soon they added up. 

When I finished making a few hundred blocks, I sorted through some of my favorite shirting prints (Okay, yes, I bought some new shirtings too), cut 3 1/2" squares and paired them with the blocks.


This is what I've done so far. I know, I know, it's going to take me forever, but I love it already. Little at a time . . . .


As I mentioned, the quilt is a version of The Birthday Quilt by Julie Hendricksen, in her book Preserving History. (And, yes, the pattern is  also in the calendar.)  I made my blocks 3" x 3"  instead of the smaller ones in the original pattern.  Good move, let me tell you. That quilt is beautiful but I never would have gotten this far if I had to make over 1,000 teeny tiny blocks. It's been fun and I hope to get it finished before MY birthday, as a gift to myself. Then maybe after that I'll get back to working on putting the rest of my Dear Jane together. Sigh, so little time to make everything. More on that next week.


First quadrant, left side. (I'm putting my finished blocks together in quadrants, instead of rows.)


Thursday, August 9, 2018

Start a Nice Fabric Collection

Here's a post I am repeating from my Small Quilt Lovers Facebook group -
Good morning, quilters - I have to say I'm happy to see so many of you are loving this month's challenge - Sewing Box Scraps (from my new book, A Prairie Journey). Your quilts so far are lovely. I chose it for a reason. It's a great quilt to practice making scrap quilts. But, I know that some of you have a hard time with scraps and maybe, if you're a beginner, you just don't have that many scraps to make this one. This is something you can accumulate over time. I wrote a blog post last year on this subject   It may help some of you who struggle with making scrap quilts.


If you love making little quilts, and you love the scrappy look, then you really don't need a huge amount of fabric by the yard. If you're like me and have a small sewing room, then it has to be contained. You just need a nice variety of prints in all different colors and a good way to store them. These can easily be small cuts. Because it can be overwhelming when you enter a quilt shop, with so many fabrics to choose from, why not make more frequent trips to build up your collection? A good fabric wardrobe, I call it. Like a nice basic wardrobe where all the pieces work together for many outfits, a nice variety of prints in all the colors will take you anywhere. You can add to this as you continue your quilting journey.


Try this - Start with your favorite color, then buy 5 or more pieces of fabric in that color. These can be 1/4 yards or fat quarters, does not have to be a yard. I like to buy smaller prints like geometrics, tiny florals, stripes but throw in a few larger prints too. Next week, buy a few more pieces in a color that coordinates with that one. As you go on, week after week or month after month, make sure you have at least several prints in these shades: light and medium blue, pink, indigo, brown, red, green, gold, tan, cream or shirting prints, black, gray, purple. Add a few checks or plaids if you like. Within a short time, you will have accumulated quite a bit of fabric for a nice collection. It will be easier to add to it over time. Then you can begin buying larger prints you love for the borders for your quilts. But, first, start with the basics.


This quilt below is a perfect example and you can see I've used a good variety of prints in all different colors.


Storing your fabric is important. I sort and store according to color. Plastic bins or drawers, photo boxes, large zip lock bags, all work for scraps. Throwing them into a large bin does not work for me -  too much of a jumbled mess and I can never find what I need. If they're sorted, they're easily accessible when I want to start a project. It's also a good way for me to see what colors I am lacking and need to buy more of in the future. I started making something last week and realized I was low on green and gold fabric. These are not my favorite colors but l still like to add small pieces of them to a scrap quilt. Now, this is in my head for the next time I shop. Move over, Blue! 


Monday, August 6, 2018

Conversation Prints

 The small quilt challenge for August in my online groups is Sewing Box Scraps from my book A Prairie Journey


I used some reproduction fabrics called conversational prints in some of the "bricks." These were novelty prints that were popular around the turn of the 20th century and contain image children, animals or other common themes. Conversational prints like these are a great way to add a little bit of whimsy to a quilt.


I love this little "bricks" quilt and had fun going through my scraps and finding prints that would blend well together and give it that "olde tyme" look.


Making this quilt was a lot of fun and I think it will be good practice for some of you to play with your fabric scraps as you put together another scrappy quilt. Use any type or color fabric you like. You can see that I used a variety of reproduction scraps in several different colors to give a little interest instead of using just one red or one brown row. Make your colored strips in the same color or fabric if scrappy doesn't appeal to you. You can also easily make this into a charm quilt -  use a different scrap for each piece. 


I also used some of the conversational prints in this other little quilt in the new book -


Judie Rothermel had a great line of fabric called Classic Conversationals a few years back and sometimes you can find these old out of print fabrics on eBay or Etsy.