Monday, March 31, 2025

Civil War Mini Row Quilt - Finishing Up

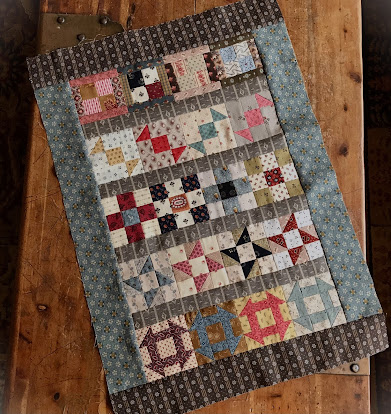
It took me a few days to go through most of my Civil War/reproduction fabrics to select the borders but I think I chose the right ones for this quilt. 

Set your blocks in five rows of four blocks and add a one-inch sashing in between (cut 1 1/2" strips). The borders should be cut 2 1/2" wide.  

You'll find the complete finishing directions in the Facebook group files and also up on my website. Take your time and find some border fabrics that match the colors in your quilt top. Remember that it's a busy quilt with very scrappy blocks so maybe try to find a border that isn't too busy and doesn't compete with those blocks. Don't hesitate to set it aside and come back to it if nothing speaks to you right away. It will all work out. If you don't care for the mismatched borders like mine, select your own setting. Add corner squares or maybe you don't even need to have a border on it. Lots of antique quilts were made without borders. Good luck! I had a lot of fun with this one so thanks for participating. It's been so much fun to see your enthusiasm and your beautiful blocks in the Facebook group.  We'll have to do it again someday.


Friday, March 28, 2025

Civil War Mini Quilt - Block #5

 Here's Block # 5 for my Civil War Mini Quilt sew along - Churn Dash


 You'll find the instructions in my Facebook group files or on my website. Click on the top tab for the Sew Along page.  


Sew the four blocks into a row. We'll be making a mini row quilt with 5 rows of these tiny blocks. These little ones take some patience but if you slow down, cut accurately and then sew with a scant 1/4" seam you should have no trouble. 

This is the last block for the quilt. I need to finish my top and so I'll give you the finishing directions for the entire quilt on Monday, March 31. Hope you had fun with these tiny blocks and combing through all of your Civil War scraps! I sure did. Thanks for participating. 


Have a good weekend! 


Friday, March 21, 2025

Civil War Mini Quilt Sew Along - Block #4

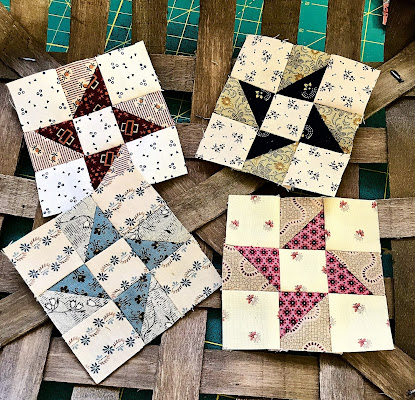
 Here's Block # 4 for my Civil War Mini Quilt sew along - Friendship Star


 You'll find the instructions in my Facebook group files or on my website. Click on the top tab for the Sew Along page.  


Aren't they cute? And they're a lot of fun to make. Despite the tiny half-square triangles, LOL. But after the block I gave you a couple of weeks ago you should be used to them. Just take your time and cut accurately. If you have problems with your blocks coming up short, try sewing a scant 1/4" seam and then when you cut your pieces, place your ruler marking on top of the fabric like so: 


If I'm cutting 1 1/2" strips then the ruler marking for 1 1/2" (dashed line) should be placed on top of the fabric on the left side. If the dashed line is off the fabric and on the mat then your strip will be short of the required measurement. 

Some people in the FB group were not aware of this and using their cutting mat instead of a ruler to measure the pieces. The mat markings can be inconsistent so a ruler is a better option. I always like to use a non-slip ruler. This one in the photo  is the Olfa Frosted. With these tiny blocks, accuracy is important and you don't want to chance that your fabric will slide around as you cut. 

Also, make sure you choose fabrics with enough contrast between your HSTs and the background so the pieces don't all blend into the background. And, you'll want to use a darker fabric for the star points to make them shine!

Sew the blocks into a row. We'll be making a mini row quilt with 5 rows of these tiny blocks. 

Block #5 (the last block) will be posted on Friday, March 28 along with finishing directions.  

Have a good weekend! 


Saturday, March 15, 2025

Civil War Mini Quilt Sew Along - Block 3

Here's Block #3 of our Civil War Mini Quilt Sew Along - 3" x 3" Nine Patch. 

Small nine-patch blocks are a favorite of mine. Nice and easy, using 1 1/2" cut squares. Switch up the light and dark background squares if you like or make them all scrappy. This is going to be a mini row quilt with five rows of four blocks. Make four nine-patch blocks for setting in the row quilt this week. You'll find the instructions in my Facebook group files or on my website. Click on the top tab for the Sew Along page.  

  
          Have fun!  Two more blocks to go!  Block # 4 will be posted on Friday,  March 21.  


Friday, March 7, 2025

Civil War Mini Sew Along - Block #2

Here's Block # 3 for my Civil War Mini sew along - Penny Candy. Too sweet or what? 

Yes, there was hard candy during the Civil War! By the mid-1800s, numerous factories in the U.S. were manufacturing candy, mostly producing individual hard candies which were then sold loose. Peppermints, lemon drops, jelly beans, rock candy and molasses twists were common sweets. Hard candies were also very popular among soldiers during the war because they were small treats that didn’t spoil. They were often part of a soldier’s rations. Enjoy making some penny candy blocks!


 You'll find the instructions in my Facebook group files or on my website. Click on the top tab for the Sew Along page.  

Sew the blocks you made last week into a row. We'll be making a mini row quilt with 5 rows of these tiny blocks. Each week through March I'll give you directions to make a new block.

Block # 3 will be posted on Friday,  March 14.  

Have a good weekend!