Monday, August 12, 2024

Part 2 Simple Square in Square Quilt

Here's part 2 of my simple blue and white Square in Square Star quilt I posted about last week.


Directions are in my FB group files. I will also put them up on my website later today.


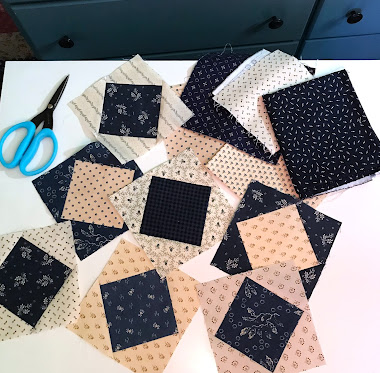
Make 9 blocks. I know it's a very simple design for some of you but hope you still have fun with it.


Fold your center square in half, then half again (quarters). Line up the triangle points with the lines as you attach the triangles. Sew opposite triangles first, then add the others. 


Make sure you follow the other tips in the pattern for sewing your blocks together so that your points come out perfectly (or almost). I hear some quilters have trouble with points that get lost. This will really help you in making lots of other quilts.


Sew to the right of the "X" to avoid cut-off points.

I finished sewing my blocks together last night and picked out a couple of border fabrics but got tired and couldn't decide so thought I'd just sleep on it.


This morning I woke up and said "What was I thinking??" LOL. I love that print on the left but I'll probably go with the dark blue border . . . . If you squint you can see the Star!

* * *

Coming up: I often hear that some of my followers in the FB group wish they could make more small quilts, or have several of my patterns on a list to make "Someday" but don't seem to be able to get around to actually making them. When I started leading groups years ago we used the Challenge Method: I would select one small quilt per month from one of my books and people would challenge themselves to make that quilt, following along with the progress of others. Lots of quilts were made! 


I always tried to encourage quilters to break down their monthly project into 4 weeks, cutting and piecing in a couple of hours the first week, making the blocks the next week, perhaps taking only another couple of hours, adding borders next and then finishing up in the last week. It's a very efficient way to get things done in small chunks of time if you schedule them. So not too stressful. And it leaves time for doing other things. 


By the end of the year, some quilters had finished twelve small quilts! That's pretty impressive if you think about it and if you're someone who just can't seem to organize yourself to make the things you want to make.


So this means we'll be using these ideas as we begin a few new sew alongs in my FB group soon, working through some of your favorite quilts from some of my books or patterns. Your choice on what quilt you would like to make or maybe I'll give you a block where you challenge yourself to make a small quilt out if it. Seeing photos of what others are doing and watching their progress can be very inspiring. Something to look forward to.


Tuesday, August 6, 2024

Square-in-Square Quilt

My Facebook group is making a sweet little blue and white quilt in two parts. We'll be making some easy square-in-square blocks in Step 1 and then assembling them into a small quilt with borders in Step 2 which will be posted next Monday, August 12.  If you're in the group, you'll find the simple directions in the group files. Or, you can get the block directions from my website Country Lane Quilts.


Some years ago, I saved a picture of a blue and white antique pillow I found in an old decorating book and when I came across the photo recently I thought, why not turn this into a sweet little doll quilt?? Square-in-square blocks stitch up pretty fast so it's a fun little project. 

What is it about blue and white quilts? 


You'll see in Step 2 that when the blocks are put together you get a secondary image of a star. All you'll do this week is make 9 square-in-square blocks - 4 with light centers and 5 with dark centers. Next week I'll show you how to put the quilt together with borders. Simple and fun. 

This is intended as a two-color quilt so of course you may use any two colors you like. I happen to love blue so it was easy for me to pick out some favorite blue and light scraps. Whatever colors you choose, make sure you use enough contrast so that the star appears.


Step 2 will be uploaded on Monday, August 12. 


Saturday, June 8, 2024

Summer Challenge Quilt

My Facebook group began working on a new little group project - my Small Quilt Challenge for Summer 2024. The challenge is to make a small quilt using this block.


You know I love antique quilts and reproducing them with today's reproduction fabrics. I saw some antique blocks in these colors and when I saw the name of the blocks I knew some of you would appreciate this choice. The block we'll be using is called "Contrary Wife" and I have to smile when I hear it. Who among us hasn't been called "contrary" when we express our opinions or stand up for ourselves?? I'm sure my husband can recall a few times in our almost 40 years together when I've lived up to that title, LOL.


The combination of pink and blue/indigo fabrics mixed with light shirting prints is a favorite of mine and I have to say I have a nice collection of fabrics in these colors. So choosing was easy. 


Double pinks and indigo blue were a popular color choice for quilts made during the latter part of the nineteenth century. I picked up this one (below) at a quilt show last year.


*  *  *

The Contrary Wife block is pretty simple and you'll find directions in the FB group files under Summer Challenge 2024. I also uploaded it to my website. Look for the Summer Challenge page.


Make your quilt using as many blocks as you like and choose any setting or colors you prefer. There are some suggestions in the file. The block measures 4 1/2" finished so if you're new to making small quilts, take a look at the FB group files for some tips on sewing small blocks. Those of you who have some of my books can look at the Quiltmaking Basics sections at the back of the books for sewing tips.


There is no deadline. Take your time and play around with fabrics until you find the perfect combination of prints. I'm looking forward to seeing some of your quilts in the Facebook group!


There are so many possibilities to make a cute little quilt using this block. Play around with settings until you come up with a pleasing arrangement. Hope you have fun with it!

And here's to all of the contrary wives/women who speak their minds and stand up for themselves!


Friday, May 17, 2024

Dear Jane Motivation

Quilting friends, I can't believe we're already on Week 9 of Dear Jane Fridays in my Facebook group. I hope some of you are following along too. I'm seeing lots of good progress.


For years, I enjoyed looking at all the wonderful Dear Jane quilts others had made and always thought: Never in a million years would I be able to finish one of those. Well, guess what? I loved this quilt so much and finally took the leap 14 years ago (!). I know, I know - some quilters finish in a year or less. Don’t let that deter you. You have to do it your own way. My journey was a lot longer than most - but my excuse is that I also wrote a few books and made numerous other quilts during that time. My DJ top is finished and now I just need to quilt it. Who’d have guessed?? Lesson: If I can do it, so can you. But you really, really have to want to do it.


Remember: There’s only one way to make this quilt and that's one block at a time. Do your best, persevere and you will get there. The blocks do add up over time.


If you get stuck, check out some of the online resources for help - https://thatquilt.blogspot.com/ is a good one. YouTube videos on making the Dear Jane blocks are also very helpful. If you're not hand piecing the blocks, learning how to paper piece by machine is a very quick and efficient way to make many of them. It's worth the effort to learn how to do this. Here's one of my favorite paper piecing tutorials if you need help getting started.


If you're thinking about beginning Jane's quilt or have gotten stalled on one you've already started, take heart - make small goals for yourself, stick to them and keep going. One block per week maybe? That's 50 blocks in a year. Make a list of the blocks you’ve completed and try to add to it. Don't beat yourself up if and when you need to stop. My progress was sporadic. Just keep making the blocks, continue on with your journey and who knows, maybe you'll also become motivated to finish.


Have a good weekend! Try making a block if you have the time.


Saturday, April 27, 2024

Dear Jane Fridays

Each Friday in my Facebook group, some members work on starting or finishing their Dear Jane quilts. It's not a teaching group, just a checking-on-your-progress group to help keep you accountable and move forward. Sometimes inspiration happens when like-minded quilters get together. Seeing the progress that others are making on their blocks/quilt can be very motivating.

Jane Stickle used many different fabrics in her quilt, and for a long time it seemed that each printed fabric appeared in only one block on the quilt. Now it has been determined that there are 3 blocks that repeat fabrics. See if you can find them! (I tried but couldn't.)


(Photos of the quilt courtesy of the Bennington Museum)

One of the things I was thinking about this week was that making this quilt was all about the journey and the learning. I wonder if it is the same for you? The Dear Jane journey starts with one block. Try an easy one if you’re intimidated. Then try another and another. I learned so much making this quilt. I pushed myself to do curved piecing, reverse applique and paper piecing. With each block completed it got a little more thrilling to see them pile up. All the while I was becoming a better quilter.

if you 're intent on making this quilt, the key to success might be to keep it uppermost in your mind. While I was working on mine, I bought a special box to keep my blocks in and kept it near my desk.


Eventually I bought one of those Ikea rolling carts and stored all of the things I needed to make the quilt - my block box, the book, my notebook, tools, foundation paper and supplies and special fabrics I knew I wanted to use for the remainder of the blocks. Everything in one place where I could see it. The cart stayed in a corner of my sewing room but I could easily roll it out near my sewing table when I became motivated to work on some blocks. I printed out a list of all the numbered blocks and checked them off to keep track of my progress.


There were times I had to take long breaks from working on it. When I picked it up again, I would challenge myself to make 10 or 20 blocks within a certain time frame. It helped to set small deadlines for myself. Soon I was able to finish 35, then 50 blocks. Checking them off the list one by one. I remember hitting 100 blocks. That was a milestone - almost halfway there. i kept at it. And now I'm done.


If you're intent on finishing your quilt, then push yourself just a little bit every now and then and I know you’ll be pleased at the progress you’ll make. Join us in the group on Fridays if you need a nudge.


Thursday, April 11, 2024

Blog Trouble

Just wanted to let all of you who have subscribed to email updates know that when I write a new blog post you probably will not be getting any email notifications. The Mail Chimp service which is supposed to send out the emails to you is not working out. Time after time they do not send out the emails to let you know there is a new blog post from me. This has been happening for awhile and is disappointing to say the least. I have a few thousand followers and I use the blog more for quilting information than advertising. Most of these services are set up for marketing or advertising products. I refuse to pay $200 or more per month for them or another service to do this for me. Not exactly cost effective for me.


Clearly, I cannot send out thousands of emails myself every time I write a post. So, sorry to say - you are on your own. All of you will have to find or bookmark my blog and check every now and then if you want to read all of the IMPORTANT and INCREDIBLE things I have to say, haha. Then, eventually, it will probably fade away because everyone will forget. I enjoy blogging when I have time and something to say or just want to let you know about any quilting info. It's definitely an end to an era. Nobody really blogs anymore anyway. Glad I have been able to connect with some of you for so long. Thanks for the support! 

I'll still be quilting, possibly blogging about it. You can always find me on Instagram or my FB group if you get desperate. 


Wednesday, April 10, 2024

Dear Jane Color Scheme

We've been working on making blocks for the Dear Jane quilt in my Facebook group. I've been trying to post a little bit about the background of the quilt each Friday. Last week we focused on color schemes and I mentioned that Jane Stickle did not use colors at random when she made her quilt. When you see the quilt in person you're immediately struck by the  fact that it is so well preserved and the fabrics are so vibrant. It's actually pretty colorful considering it's over 160 years old!


If you look at the photo of the original quilt, you might notice that the blocks are laid out in colored rows in what is called a Trip Around the World (TATW) motif. It’s a way of arranging your blocks made from specific colors so that they radiate outward from the center almost in a diamond pattern. Can you see it? I'm not a quilt historian so I don't know how popular this was when Jane was making her quilt. I do know they were especially popular later in the nineteenth century. But it seems Jane was always ahead of her time.

 At the center of Jane's quilt is a green block, surrounded by a row of 4 yellow blocks, then purple, red, pink blocks. The next row looks purple, although it’s likely that some of the fabrics may have faded to brown over the years. Last is a row of red with a few oranges. The rest of the blocks surrounding them are mostly browns, mixed with a few blue blocks. The four corner blocks are green. The top right block is more of a bluish green. The four corner triangles (kites) are pink (one is rather faded).


My rough coloring so you can see the TATW/Trip Around the World motif. There's a chart to download in the group files so you can cross off the blocks you've finished to keep track of your progress.

I used a blue block for my center instead of green because I love blue more than green and wasn’t even thinking about using the same colors as Jane did. When I did learn about the rows of colors it sounded cool but I had already made more than a few blocks. I wish I had followed her colors a little more closely. I got as far as the yellow blocks and quit after arranging the pink blocks for my TATW. I did do the green corners and the pink corner kites (triangles). One of my corner blocks (A-13, far right, top) was made in pink before I decided to attempt the four green corners so I switched it up with the block next to it in Row A which I had already made in green. I decided to live with the mistake instead of remaking both blocks. I knew someone with an eagle eye would notice someday that the top row was out of order so I am 'fessing up now!  Improvise, improvise. 


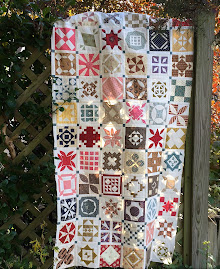
My quilt top last year before I added the triangle borders. I need to find some space to hang it before I take a better picture.  The pink and yellow blocks stand out a bit and you can see a little of the TATW scheme that Jane used. 

If you're sewing along in my group, remember that this is your quilt and you can make it any way you like. I’m only giving this information for those who might want to reproduce Jane's quilt closely. It's fun to think about how organized she was, playing around with her fabrics. 


The Bennington Museum website has some nice photos of the Jane Stickle quilt.


Whatever colors or style of fabric you choose, here’s a tip: Make sure you LOVE the fabrics you pick. For me, this was a good opportunity to dig deep into my stash and find prints or favorite scraps of prints I loved and was saving for "something special." THIS quilt is the Something Special so go ahead and cut into some of those fabrics you’re hoarding. You won’t be sorry.


Sunday, April 7, 2024

Dear Jane

Well, I finally finished putting my Dear Jane top together.  Not perfect by any means, but it is DONE. 


It still needs a good pressing, some thread picking and a few other little things fixed before I add the border for the scallops and then attempt to baste it for hand quilting.

This will take me awhile. I learned so much throughout the process of making this quilt. For instance, reverse applique. curved piecing and paper piecing, along with better basic sewing skills for making small blocks. Not to mention PATIENCE. So now I have to learn how to make a scalloped border - Ugh. Not looking forward to that. Hopefully, it won't take me another 14 years . . . . 


In looking at photos of finished DJ quilts, I noticed that someone in my group used a pretty light print fabric for her  scallop border instead of a solid and so now I'm rethinking the muslin/ecology cloth I was going to use for mine. Decisions, decisions . . . 


One of the many perks of having the Electric Quilt Dear Jane software is that it allows you to print out these assorted pages with pretty borders for keeping a Dear Jane journal or to just use for notes on your sewing journey. I’ve kept my own notes in a binder since I started in 2010 but I’m patiently waiting until I finish the entire quilt to copy them down onto my pretty pages.


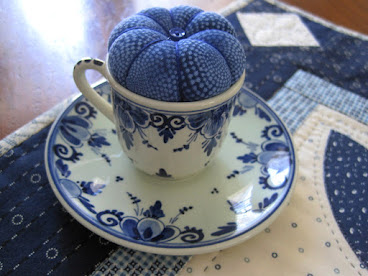
After I finished I took a little break and just played around with some extra blocks from the recent basket sew along and made this little mug mat. They always look so cute displayed around the house. Easy stitching . . .  


There's some Dear Jane motivation in my Facebook group on Fridays as some of us move forward and make progress. If you're interested in starting or just really want to get back to working on your blocks, join the conversation as we motivate each other to work together on this wonderful quilt. Trust me, if I can finish it, you can too. Kathleen Tracy Quilts FB group. I'll keep you up to date.