Friday, September 23, 2016

And Many More

Thank you for all the kind birthday wishes! Thought you would enjoy seeing  a couple of my presents. Stop right here if you are sick and tired of hearing about my birthday. (Not my fault. Sue -  you're the one who started this and let the cat out of the bag! LOL)


I needed a new pair of scissors. I received two! My daughter also bought the little dish and polka dot case in one of my favorite colors.


(Quilt: Papa's Shirts, Mama's Dresses Doll Quilt Club )


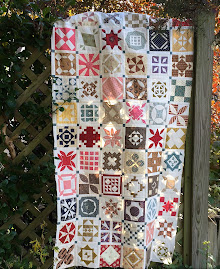
Sue B. gave me some beautiful antique quilt blocks. 


She has a set of blocks as well and we are going to put them together and make matching quilts  : ) 


You may remember that my daughter gave me a little "birdie" dish last year too. 


Perfect for pins.


I love pretty little ceramic dishes for my sewing bits and bobs and rings and earrings and such. 

Karen gave me a mini blue and white quilt patterned after the blue and white quilt she made for her challenge -


I got a real kick out of this tiny book my son bought for me as a joke - taken from an actual book on manners for wives published in 1913.  


Lots of good tips on how I can be a better wife (if he can possibly imagine a better wife, haha) - 


Honestly, I NEVER tell him about or bore him with the dreadful crimes our servants have committed during the day.  Wouldn't dream of it.


Where am I all the time?? The older I get, the harder it is to tell some days . . . .


My husband made me promise I would sit by the fire with him and sing to him every night. He said he would absolutely LOVE that . . . .


Julia made me a pretty blue necklace.


I got the mini Keurig I wanted.

All in all it was a good day. And, if you are rolling your eyes about now, I promise I will NOT mention my birthday ever again. Matter of fact, I might not even have one next year . . . 


Monday, September 19, 2016

Blue and White Challenge Quilt

We had a blue and white quilt challenge in my small quilt groups. Of course, I couldn't even think of not making something (blue is my favorite color).


Here's what inspired me: Some of you may remember my encounter with a mysterious coffee cups quilt awhile ago.  You can read about it here.  

Shortly after I wrote that post,  the mystery was solved.  I knew that a blue coffee cups quilt was in my future. This challenge was the perfect opportunity to achieve my goal.


I have to smile every time I look at it so it will surely end up hanging in my kitchen while I make my morning coffee, to perk me up. There will be a pattern available on my website soon so you can make your own. In YOUR favorite color.


Thanks to all of you who participated in this sweet little challenge! It was a joy to see the gorgeous quilts you made. Looking for quilting fun and inspiration? Join my group.

Monday, September 12, 2016

Sneak Peek

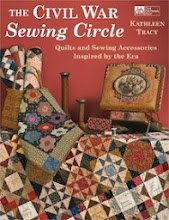
I'm giddy with excitement because there are some pictures of quilts from my new book up on Martingale's website.  This means we're getting close to publication, folks.


The book is due to ship to shops on December 6 or thereabouts. It's still a bit early but some of you have asked and yes, I will be taking pre-orders of signed books beginning in a few weeks. Check back here later. Also, talk to your local quilt shop about ordering books early. Some of them may be taking pre-orders as well. 


I have so many favorites in this book and I hope you will too. There will be a monthly "Club" in my small quilt groups beginning in January where we'll be making some of the quilts using the patterns in the book. Won't that be fun? (Yes, you have to buy the book in order to participate.) Quilt shops may be hosting Small & Scrappy clubs as well once the book is released. Always fun to do this in a small group of quilting friends. 


Hope you enjoyed seeing this sneak peek of  Small and Scrappy. They really did a fantastic job photographing my quilts.


Thursday, September 1, 2016

September at Last

At my age I should not be asking for time to fly by fast but I am so ready for September and cool, cool weather. My garden has gone from bad to worse. If it's not hot hot hot here then it's raining. And my allergies are awful so I have not felt like spending time tending to anything in the front or backyard. Sad, but I'd rather be at the Chicago Botanic Garden, walking and taking in the fresh air and nicely groomed gardens there. 


Ahhhh

Guess my other excuse for not gardening is I've been busy quilting. I've still got two more quilts to hand quilt for my Papa's Shirts & Mama's Dresses doll quilt club.  You've already seen pattern # 1 from the club - 


Cherry Baskets 

Here's the quilt I designed for August - Pattern # 2 - Laundry Day.  


Don't you love it? Sue Bennett made this one (I picked the fabrics, she sewed). She even made a matching pincushion! Love to see quilters having fun with my patterns.


(Cute pincushion displayed with a few of the flowers that actually made it through the summer in my garden . . . .) 

Hope some of you are enjoying these little quilts. I know you are thinking -  Whaaaat? They're so-light colored. Where are the dark reproduction fabrics?? That's because the first two were from the hot hot days of summer (July and August) and if you look hard enough, the reproductions prints are still there, they're just lighter ones mixed with some of my favorite shirtings (lights). Don't worry -  the quilts in this club series get progressively darker as the seasons move along. (September's quilt has lots of reds and blue. And applique! October's quilt has some brown in it. . . . )  You can purchase the doll quilt club patterns here.

*   *   * 

I'm also working on finishing up a quilt for our small quilt group(s) challenge - which is to make a Blue & White quilt. (You'll get a real kick out of mine and I know some of you will want to make one for yourself. Maybe I'll make up a pattern.) We'll have an online show of the quilts on September 16. I've finished the top and still have to quilt it. These challenges are really a lot of fun. This time you can pick your own block or pattern and make it in blue and white. Simple is fine (sometimes better).  We had a great turnout for the Red & White show last December. Hope some of you will join us again. 


You've got 2 weeks - grab some blue and white fabric and go make something . . . . 

Tuesday, August 23, 2016

Needle and Thread, Etc.

Thank you for all of the nice comments about my hand quilting post last week. I suspected that there were quite a few of you who were interested in trying this and it seems I was right.


Quilting can be such an individual "sport." It's difficult to give recommendations when what I suggest may not be close to being right for you. You have to experiment with the tools available and find what works best.

But, since you asked:  While there are probably many good quilting threads out there that will suit you just fine, my all-time favorite hand quilting thread is the YLI brand. It's a 100% cotton thread with a glazed finish. I'm partial to the light brown as it goes well with light and dark fabrics and gives a nice primitive touch to my small quilts. I have several colors and interchange them depending upon the quilt.  


Needles:  I wish I could be more specific but I am sorry to tell you that there is no CORRECT needle to use for hand quilting. Because everyone is different, what is comfortable for me to use may not be right for you. The needle you use makes a huge difference. It should be one you can handle and thread easily or your quilting adventures will be disappointing and frustrating. You will need to select the needle you feel most comfortable using and should try several to see which one fits YOU. Don't give up on quilting until you try several different needle sizes and brands. I often use a different needle depending upon the fabric used in the project I am quilting or how my hands are feeling that day. 


Many quilters use a traditional "Between" needle which is short, sturdy and thicker than most hand sewing needles. This is the needle most often recommended when you are just beginning to quilt. But, understand that not every needle is the perfect fit for every quilter, particularly when you are just starting out. With needles, the larger the number, the smaller the needle size. If you look at some you will see that the larger numbered needles are smaller and finer. My advice is  - Don't start out with a size 12 quilting needle or you may become discouraged. They're very small and, for me, sometimes difficult to handle and control since my fingers are rather clumsy. When I first began to quilt, I assumed it was a RULE that you had to use a small Between. While many experienced hand quilters may like them, they may not be your best choice until you gain some proficiency. If you decide to try this type of needle for your hand quilting, buy a slightly larger needle at first (smaller number, larger needle, remember?) and work your way up. Even now, I like the control that a longer needle gives me. It just feels better in my hand.


Over the years, I've tried several different needles. I found that while Betweens may work for some, when I quilted with a small Between my hand would hurt because the needle was too thick and I had a difficult time pushing it through the layers. My quilting reflected that struggle. The smaller Betweens were finer but I still had trouble handling them because they were TOO small for me. My preference now is to use a Milliner's needle (or Straw needle), which is long and thin and allows me to sew through the layers more easily than those thick Between needles. Beginners may find that they are much easier to handle and that some brands will slide through the fabric with ease. I've also discovered that a "Sharp" needle glides through the quilt better than a Between and eases the stress on my hand.


Bottom line: My quilting improved when I began to use a longer, thinner needle instead of the tiny needle other quilters told me I should be using. I found I could also load more stitches on the needle and my hand did not tire as rapidly. Know what? The Quilt Police won't even know what needle you're using. Do what makes quilting enjoyable for you. 


You can see I don't do much fancy stitching. Lots of straight lines. 

Try several different needles and sizes until you find the one that is most comfortable to use. Focus on being able to quilt a straight line at first. When your stitches become smaller with practice and you gain proficiency you can always switch to a smaller needle and do fancier quilting. Some companies sell needle assortments so you can try several different-sized needles in one package and see which one you like best. 


Here are a few good quality needles to try - 

Foxglove Cottage  - I use Jeana Kimball's size 8 Milliner's or Straw needles for hand quilting. These are my favorite needles. Long and thin but strong. 
John James Gold'n Glide needles - I like these for applique. Have also used their Milliner's and Sharps. Their quilting needles have been recommended to me. Have not tried them yet but plan to try the size 9 (although, these still look pretty small) 
Richard Hemming needles - I have tried the size 10 Milliner's needles for quilting. They also make large eye quilting needles.
Clover Black Gold needles - I've heard these are good. Haven't tried them.
Tulip Hiroshima needles -  I've heard very good things about these too and mean to pick up some soon. A little more pricey than the others.


Batting is important as well. Again, everyone who quilts has a favorite batting and the one I use may not be one you will like. For what it's worth, my favorite is the Fairfield brand 100% natural cotton batting made by the Polyfil Company. Low loft, very thin, easy to quilt through. Let me repeat that -  a thin batting is easier to quilt through. It also gives your small quilts that antique look. Shrinks a little when washed so your quilt will pucker slightly after it dries. Keep in mind that heavier battings like Warm & Natural are great for large machine-quilted quilts but can make hand quilting your small quilt extremely difficult. Why not make it as easy as possible? I've heard that some quilters use flannel but I have never tried it on my small quilts. I like a batting that gives a little body to my project and I'm not sure flannel will do that. But I may still try it one day. Polyester batting will make your quilt look too puffy so avoid those. Some swear by wool. I found what I like and I stick with it. Cotton works for me. Try some different kinds. 

You asked: No, I do not use a hoop. I tried it and now just prefer to quilt on my lap. Usually with my feet up. I place my pin-basted, marked project on top of a cushioned lap desk (see photo below). The lap desk sits on top of a small pillow which is then placed upon my lap. The top of the lap desk is flat and supports my hands and wrists when I sew. As unconventional as it sounds, it's a perfect solution for me and reduces any neck or shoulder stress. The pillow raises my quilt to a comfortable level where I can see what I'm stitching without contorting my neck or getting eyestrain because it's too far away.  I can also lean back on a sofa pillow, tilt the desk and lift up my knees on the couch to support the pillow underneath if I feel like it. My back and shoulders are more relaxed when I'm not hunched over. Way too much information??  What can I say -  I like to get comfy cozy when I quilt. 


I know that there is a lot to learn - you have to be patient. Perfection does not come the first time you quilt. Also, keep in mind I am not an expert. I just know what works for me to help me do the kind of quilting I choose to do right now, which is simple, enjoyable stuff. Who knows - I may aspire to become a much better quilter and quilt feathers someday when I retire and have more time. That's not feasible for me right now.


There are many resources for all of this on the internet so do some research. YouTube has numerous hand quilting videos and Craftsy even has an online class or two.  Think about my suggestions or ask around at your local shop or guild. And then, go ahead, mark your quilt and get started! Hand quilting is fun. But you won't really know until you try.


Thursday, August 18, 2016

Quilting with Stencils

Small quilts that are quilted very simply really appeal to me. I'm in the process of hand quilting one of the quilts for my doll quilt club right now. So forgive me if I repeat myself by blogging about it again and again.


If you haven't tried hand quilting, what's stopping you? Little quilts are perfect for practicing your hand quilting. I think it really adds something to these small projects and I always like to do my part to encourage quilters to try it. Even if the first one you try isn't all that good, keep at it and you'll get better. When I've been away from it for awhile and then pick it up again those first few lines of stitching are a little less straight than I'd prefer. But it comes back quickly and you pick up a certain rhythm if you do it long enough and get in the "zone." Straight-line quilting is often easy enough for beginners and if that doesn't quite do it for you, you can always try a quilting stencil to add a little more to your quilt.

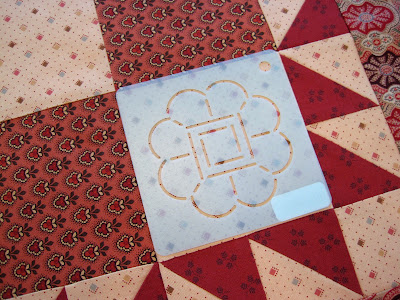
Quilting stencils are easy to use with a water soluble marking pen or other type of fabric marker. Your local quilt shop probably carries stencils in different sizes along with marking tools. You can often find stencils at booths when you shop at the larger quilt shows. You can also find them online. The Stencil Company sells a nice variety of stencils for small quilt blocks and borders.


This little wavy stencil is one of my favorites and I like to use it often. Simple, but a little bit special without overpowering the border.

I don't ever plan on winning any prizes in a show for my hand quilting. I'm not afraid to admit that I still enjoy making things even if I'm not perfect at them. If I waited until I did things perfectly I'd never make anything! A friend of mine said she thought all hand quilting was always supposed to be done free hand (Lord no!) and so she was hesitant to try it because she had no skills and was afraid she'd never get her lines straight. 

If this is what's keeping you from trying it - take advantage of tools that make quilting easier. There's a product called Tiger Tape that really helps you learn to space your stitches evenly if you're just beginning. You line up the tape along the place you want to stitch and then follow the markings on the tape to keep your stitches in line. If it helps you stitch straighter lines, why not use it? There's no rule that says quilting has to be done a certain way except among the purists or if you're entering your quilt in a show. Then, of course, it matters and it should be perfect. But, if you're just beginning and hesitant to try for this reason - remember, in the 19th century, some wonderful antique quilts were hand quilted. If you take a close look, you'll see that not all of them were necessarily quilted with exceptional skill. Even the average quilter hand quilted her quilts. We all have to begin somewhere and the point is to enjoy the process. You get better with practice. 


If you do become inspired to try hand quilting, you can try several different pens or pencils to mark your stitching lines. I've tried but don't especially care for the colored lead pens or pencils. I've also tried a chalk marker but didn't like that very much either. But that's just me. I have not tried a Frixion pen yet. Despite my preferences, some of these may be good options for you so try them and see. You need to find what works best for YOU. After trying several different products, I prefer to use a use a fine-point washable quilt marking pen and have found several made by the Clover company that work well and wash out nicely. I use a Clover blue water-soluble marking pen on lighter fabrics and a Clover white pen for marking my darker fabrics. 


Here's a tip: Whichever marking tool you try, follow the directions on the package.  If you decide to use a washable marker, after you finish quilting, do not press or place your quilt in the dryer until you are sure that all of the markings have been washed out. I have almost ruined a quilt by not being careful. Depending upon the pen, some markings will be set with HEAT and won't come out easily. (The Frixion pen markings apparently disappear with heat and reappear when cold so again, check the directions.) Just take your time, put on your glasses so you can see the lines (that's a reminder to myself!) and gently wash the top of the quilt with a damp cloth until all of the markings are off. Then, let it air dry. If you can still see some marks, wash it again.

If you think hand quilting is difficult, try it before you decide it's not for you. It really doesn't have to be perfect - you will get better with practice. Or, maybe, like me, you'll find that it won't matter if your stitches aren't perfect. My intentions are always good, but sometimes quirky, childlike stitches suit me just fine. 


Border stencils that measure 2 or 2.5 inches are perfect for quilting the borders of small quilts.


You can also find stencils in many different sizes that match the size of your blocks. 


Go ahead -  mark the lines with your preferred marking tool.


Then, stitch on the lines with quilting thread (more on that topic next week). 

Follow the directions on the pen or pencil to erase or wash off the markings. I always play it safe and use cold water instead of hot when I wash mine. The little quilt you see above is one of my favorites and it's included in my new book. I took my time last year while I was making all of those quilts and had fun quilting most of them by hand.  

If I use a simple quilting design, it usually takes a couple of evenings or a week at most to finish a small quilt if I keep at it every day. I am clearly not an expert and my stitches could be a little smaller and straighter for sure but it's still so much fun to sit and stitch and see what the quilting adds to finishing a quilt.  It doesn't have to be heavily quilted - straight lines or Xs are perfectly fine. Even a little bit of hand quilting will give a special look to your quilt. As a matter of fact, I prefer less rather than more quilting on my quilts so it doesn't detract from the quilt as a whole. And, don't forget, if you make a mistake or find that your stitches are quirky or a little less than perfect - Oh well, try not to worry too much. Antique doll quilts were not perfect either. We're just having fun here.


 Papa's Shirts doll quilt club patterns for August were mailed out early this week so they should be arriving in your mailbox soon.