Tuesday, July 1, 2014

Fantastic Fabric Pinwheels Tutorial

I find I'm happiest when I'm creating. But this summer has so far been way too busy for me to do much about that. Not that I'm unhappy exactly, but a little stressed because I'm so busy, you know the feeling? I can always feel a little something is missing when I'm not sewing. Cranky and irritable? Jittery? Too much caffeine to keep myself going and going and going? Or could it be quilting/crafting withdrawal symptoms? Who knows? When I've felt stressed and just had a little time here and there I've picked up a book to relax instead of my sewing because it's a lot easier than quilting for me and I'm also happy when I'm reading.

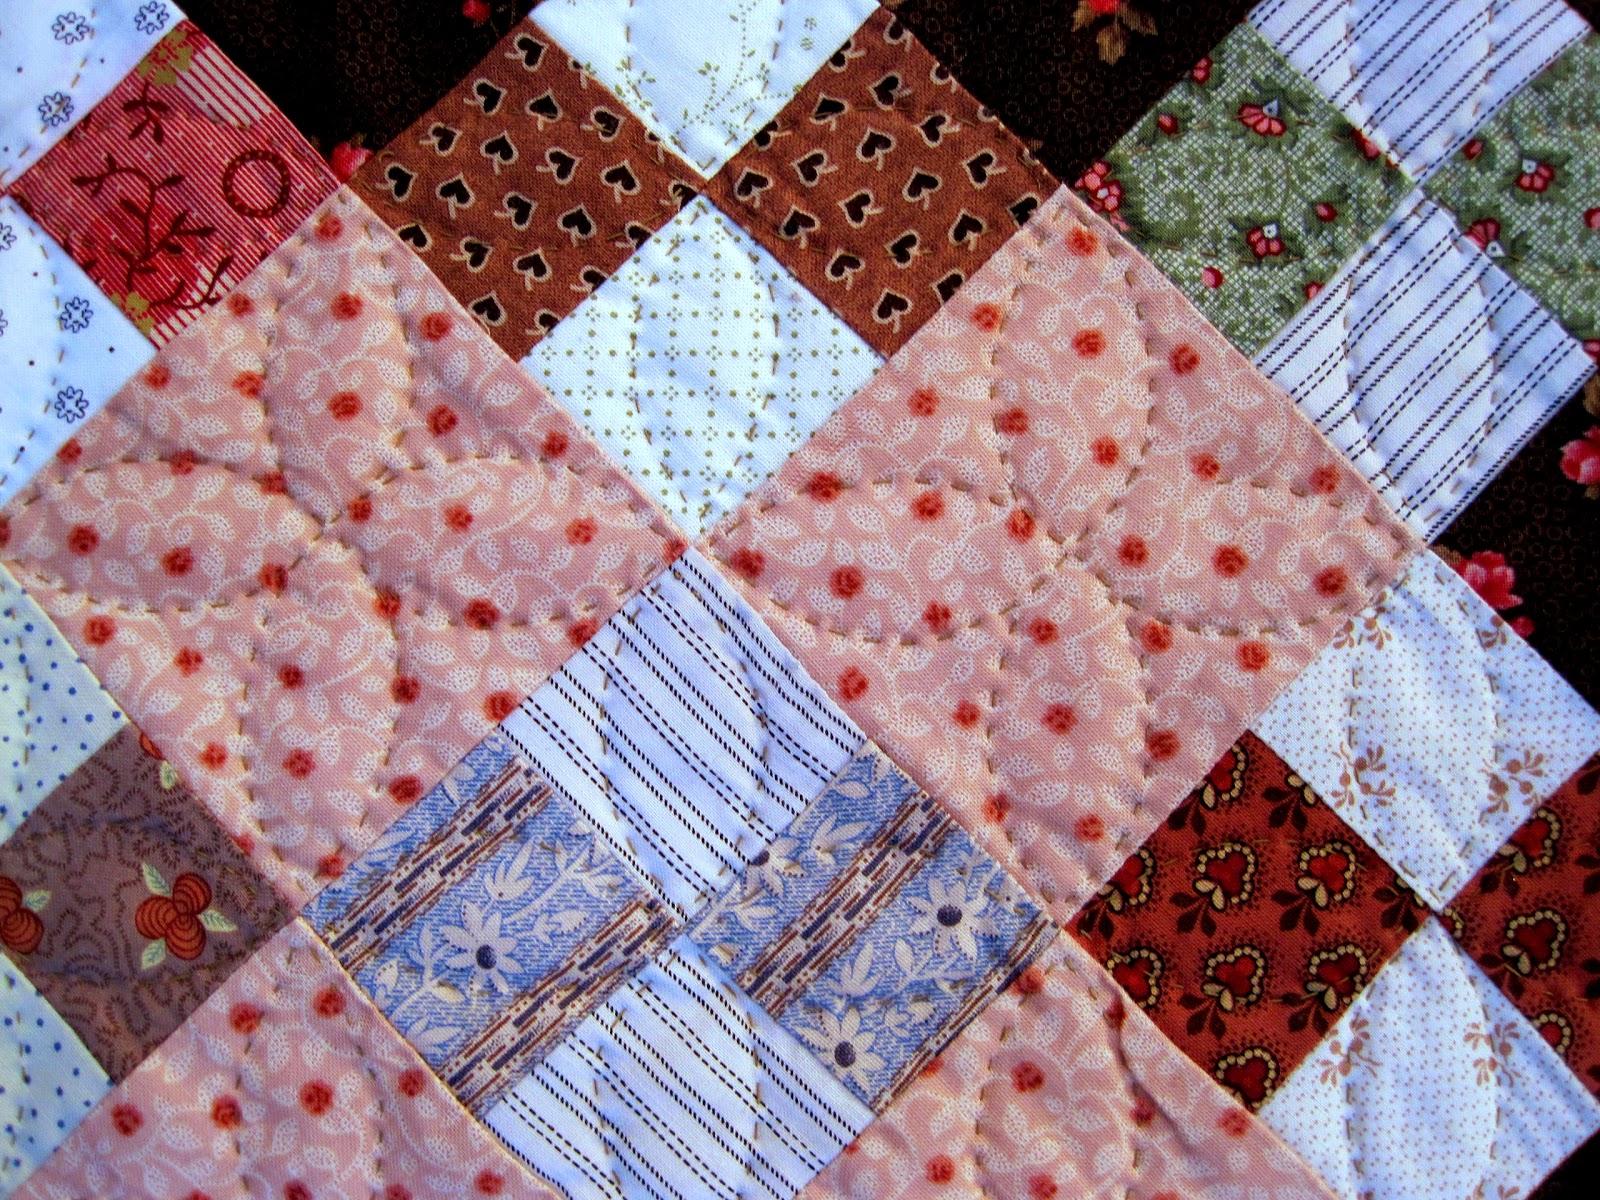
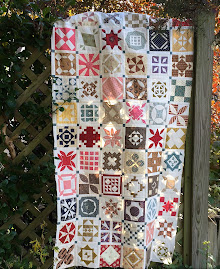
For this month's challenge in my Yahoo group, I chose this little pinwheels quilt. The prints I used to make it include scenes of children playing. Do you remember playing with pinwheels as a child? They remind me of summer and picnics and the Fourth of July.
 

 (Red, white and blue pinwheels doll quilt from American Doll Quilts)

Thinking about this quilt and summertime inspired me to try to make some three-dimensional pinwheels from fabric. (If you had told me as a child that I'd be making these as a GROWNUP I would have thought you were crazy, LOL.)  


Don't even ask me what I'll do with these. I showed them to my daughter and she said "Awww, Mom, they're so CUTE!" My husband: "Cute. What're you going to do with them??" Always the pragmatist. Instead of saying: no idea, I spent the day making these pinwheels just because I felt the urge to make something cute,  I smiled and said in my best pragmatic voice: "I hear you can utilize them in all sorts of ways - as decorations, to make banners, frig magnets, pins, hair bows, and even pinwheel wreaths." I said it to throw him off so he wouldn't guess I was making stuff  JUST TO MAKE STUFF, like a crazy person, instead of doing one of the six hundred chores on the list. After watching me make 150+ doll quilts over the years, you'd think he'd have it figured out by now and know enough not to ask "What're you going to do with them??" I may have to wear a pinwheel in my hair someday to prove a point, however.

Anyway, these were so easy to make and wouldn't you know -  they were just enough to satisfy my crafting urge. So go gather up some fabric. Here's what else you'll need:

Fabric Scraps
Fusible web (Wonder-Under, Steam-a-Seam, Heat 'n Bond, etc.)
Fabric marker or pencil
Buttons
(Scissors, iron, ruler, thread, needle)

1.  Pick two pieces of contrasting fabric. For the larger pinwheels,  I cut each square 3 1/2"  x   3 1/2". Cut a piece of fusible web the same size.


2.  Press the web to the wrong side of one fabric square. Allow it to cool and then peel off  the paper backing. Line up your fused square with the remaining fabric square and iron the sticky fusible web side to the wrong side of that square. Press for about 10 seconds or follow directions for the product you are using.

IMPORTANT: Try not to get the sticky part on your iron. I use an old pressing cloth or the piece of paper the fusible web was attached to and place it on top of the second square of fabric when I'm pressing.


Now you should have fabric fused on both sides.

3.  Then, trim the edges of your square just a bit. If your fabric starts to fray, you could try dabbing a little Fray Check along the edges.
 

4.  Next, decide which print you want to use as the background (or inside) and place that side up. Draw 2 diagonal lines with a fabric marker or a pencil.
 

5.  Cut on each line and stop halfway to the center.

 
6.  Fold 4 corners of the pinwheel blades toward the center and stitch them down one at a time where the lines intersect.


7.  Sew a cute matching or contrasting button and that's it, you're done.


Could not decide on the button. Finally went with blue, LOL. 

 
If you intend to use these to decorate a vase or flower pot, buy a couple of thin wooden dowels at a craft store and then use some hot glue to stick them onto the back of each pinwheel. (If you're feeling particularly lazy you can also use a hot glue gun to attach the buttons. Or, perhaps some of you will even be tempted to try gluing the blades to the center as well. Let me know how it works. I felt better sewing them down.)

 
To make smaller pinwheels, cut your squares a little smaller. Likewise, larger squares make larger pinwheels. For my smaller pinwheels, I used 2 3/4" squares.

 
To me, the hardest part of this whole thing is finding just the right button for the center. It's fun to act like a child again and I had a good time playing around with fabric and digging in my old button jar. By the end of the day, my mood lifted and my stress disappeared. Just looking at these makes me smile and I'm definitely happier than I was a day ago. Just sayin'.


And, look, I'm finding lots to do with them already . . . .


Monday, June 23, 2014

More Quilt Fest Pictures

More photos of Quilt Fest Chicago -

 
Sawtooth X quilt by Kathleen McCrady


Lots and lots of gorgeous antique quilts.


Beth at The Quilt Merchant booth

 
Val owns The Quilt Merchant shop.

 
Val showed me what she's been busy teaching and working on - a Patchwork of the Crosses quilt. Do I dare even wonder if I have time to try this?  English paper piecing is so much fun. I found some pretty POTC designs on Pinterest. Oh my, you gotta love all the fussy cutting quilters are doing with these blocks. Maybe I'll just try making one . . . . You've heard that line before. I bet I'll be hooked before I know it.
 

Linda Franz has written a wonderful book on making this quilt.
 

Friday, June 20, 2014

Quilt Fest Chicago

Yesterday, I attended my favorite quilt show - The International Quilt Festival in Chicago.


There was so much to see. Quilts on display and vendors galore. I'm so glad they decided to come back to Chicago after a brief hiatus.  If you're anywhere near the area, you should definitely stop by to take it all in. The show is in Rosemont, IL and runs through Saturday (No Sunday hours this year). 

Here are a few of my favorite quilts - 


The Compass Quilt by Kathleen McLaughlin


Dandelions Quilt by Kathleen McLaughlin


 Grandmother Eulah's Flower Garden Quilt by Nancy Davis-Altman


Love the detail in the quilting around the hexagons


Feathers and Stars Abound Quilt by Zvia Strahilevitz-Klein


Quilt by Karen Roxburgh


Hourglass Quilt by Betsy Chutchian


Blindman's Fancy Quilt by Deb Otto


 Antique Diva Pyramids by Diana Petterson and Stars Over Green Pastures by Mary Freeman 


I'll show more photos from the show next week.


Wednesday, June 18, 2014

Make an Illinois Block

If you are following along on the AMB tour and hoping to make a quilt with blocks from all fifty states someday, the bloggers from around the U.S. that have participated in this blog tour have given you directions to make their state blocks on their blogs.
So, here's my pattern to show you how I made my Illinos block if you want to create one of your own.

 
The finished block measures 6" x 12". Click here for the directions. Scroll down the page to the very end for the pattern. I had a lot of fun making this block and love the variety colors. Cannot wait to see what the whole quilt will look like when it's finished. Thanks, Candice, for the opportunity to participate.

*   *   *

SUSAN SMITH, GA - winner of the fabric giveaway last week -  Please contact me.


Saturday, June 14, 2014

Simple Quilting


This month our Yahoo group is working on making the little four-patch quilt from my book The Civil War Sewing Circle. Yes, we are still doing this. . . . Even if you are not part of the group, you are always welcome to join in on the fun.


Anyway, I promised I would show how I quilted the quilt using nothing more than a small bowl and washable fabric marker to mark the quilt. This is the design that resembles an orange peel (or pumpkin seed).


Instead of using an Orange Peel template or making my own from template plastic, here's what I did:

I marked the center of the block and then traced around a small bowl with a water soluble marking pen to make an arc on one side. Then I turned the quilt and used the bowl again to trace intersecting half circles around the rest of the block. Better than a template because you can do it easily with any size block, large or small - just find the right sized bowl with a nice arc. Here's a sample square I marked on paper to represent a 4-inch block:


Mark an arc along each side of the block.


The arcs intersect and you'll get this design if you mark each side of the block.

Mark each block you wish to quilt. Then just quilt on the lines and when you're finished, either wash the quilt gently or wipe with a damp cloth to remove all traces of the marking pen. It was easy to do this on a small quilt and it turned out very nice, I think. I'm not sure I'd try it on a larger quilt unless I had a lot of time.  I especially like the way it looks on the plain blocks where the stitches stand out a little more.


My favorite quilting thread is YLI quilting thread. I hardly ever use white thread - I'm very partial to the light brown as it gives a nice warm look when stitched on either light or dark fabrics. I've used the blue and red thread as well. 


If this orange peel design is not your cup of tea, then I recommend you try a small stencil from The Stencil Company. They have more designs to choose from than you can believe. I have a few 3" and 4" block stencils since that's the size I often make my small blocks. I use the 2" or 2.5 inch border stencils because I like to use rather skinny borders. 

I often get stumped by how to quilt the borders of my quilts.  Quilting with stencil designs is fun and if you're making small quilts it's a pretty simple way to finish them. Maybe this will help motivate some of you to finish up the quilting on your quilts as well. I have a nice variety of stencils and use them when I get tired of straight-line stitching (which is pretty mindless but still fun).


If you haven't been bitten by the hand quilting bug yet, you should try it.  I use very simple quilting designs and it usually takes a couple of evenings or a week at most to finish a small quilt. I can be VERY relaxing. I'm not very good at machine quilting. If I machine quilted one and ruined it, uh oh, I wouldn't have the time or inclination to fix it or make another one. If the hand quilting stitches are less than perfect or a little quirky, oh well. Antique doll quilts were not perfect either. 

I will win no prizes for the hand quilting on my doll quilts - my stitches could be a little smaller and straighter. But it sure is fun and I love the look of a little quilt that's hand quilted. If you haven't taken the time to do any hand quilting, try it out on a little doll quilt - it doesn't even have to be heavily quilted. Just try quilting straight lines or Xs in the blocks at first to get yourself going. You will improve with each stitch if you keep at it. I promise.